
Ok, you are considering “Adobe Photoshop” to create social media posts. First of all, excellent decision. And you are here because you have zero knowledge of this Adobe software that costs 9.99$ per month (Photography plan).
Photoshop has a lot of tools that can definitely overwhelm beginners (I was once a beginner too). And the learning curve with photoshop is pretty steep.
But let me tell you a life hack. “Don’t try to learn and understand everything you see in life. You need to let go of some things”. The same goes with photoshop. If you try to learn all the tools, all the tricks, especially in the beginning then you’ll go nowhere.
For example, what’s the point in learning about the clone tool (this tool is used to replace the information for one part of a picture with information from another part) when your goal is to create beautiful graphics.
It doesn’t make sense, right?
And that’s the reason why I’ve written this in-depth guide on “the basics of photoshop that you need to learn to create awesome social media graphics”. I tried my best to make the learning process as easy and fun as possible for you.
This guide will be extremely helpful for content creators, wanna-be designers, social media managers, solopreneurs, and, digital marketers who are thinking to get started with photoshop.
Just open Photoshop, grab a coffee, and start your learning!
There is a lot of talk about photoshop. But like I’ve said, I am gonna talk only from the social media design perspective only. And here are 12 things you should master. Follow along!
A painter needs a canvas to create art. In the same way, you need to create a document, where you all be creating all the graphics.
Open Photoshop, and click on the create a new button that you see on the left side (or on the top menu, click on File – New) to create a new document.
Now the main things you need to consider here are width, height, DPI, Units (use pixels always), and, Color Mode – RGB (for all web purposes).
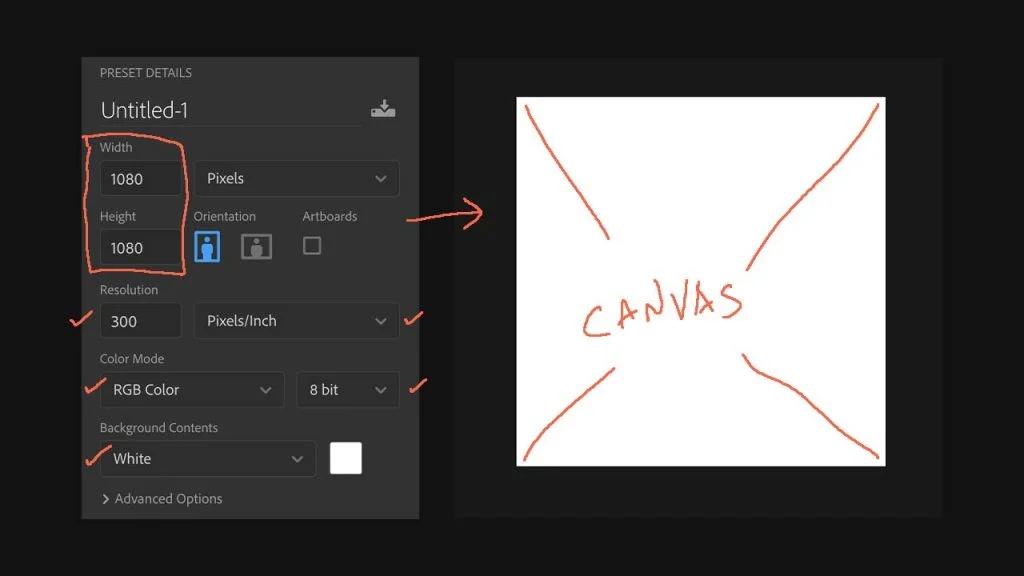
Just remember that whatever the size you choose document should be based on what social platform you are designing for. Change only the W and H sizes keep the remaining same whenever you create a new document.
Important: Whenever you create a new document, save it first (CMD or CTRL + S) and name it properly. “Not saving” is one of the most common mistakes people make when designing in Photoshop.
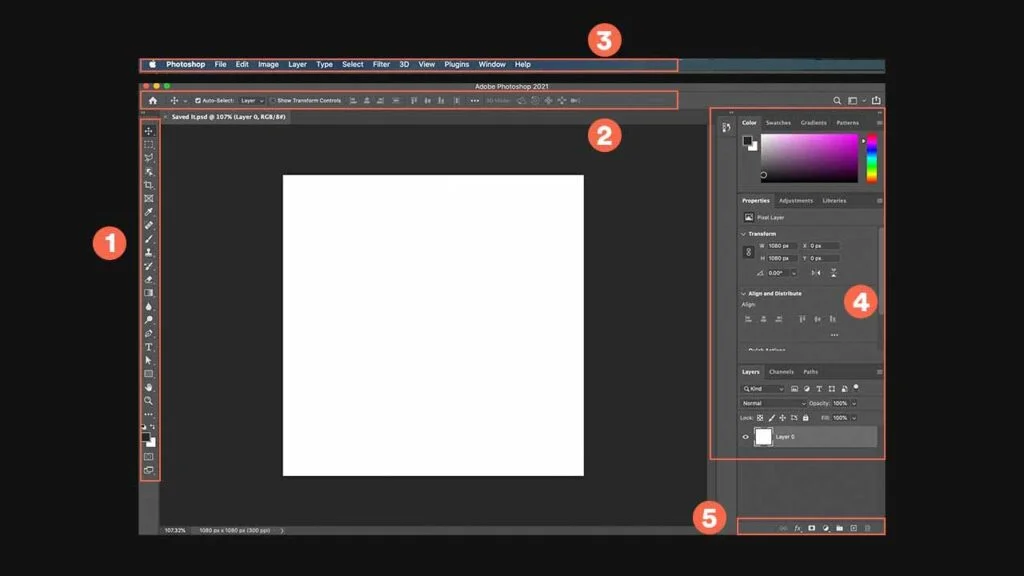
In photoshop, a workspace means the groups of panels that you see on the screen.
Let me give you the names first, so you won’t get confused.
These are the namings I’ll be using along in this article to help you locate more tools and options. So make sure you remember them.
Just to make sure that we are on the same page, click on the window (on the top menu), click on “Workspace” and then click on “Reset essentials”. This will reset the whole workspace and panel arrangements to default.
Now, on the side panel, you’ll be seeing a lot of tabs. Color tab, Layers tab, Channels tab, etc.
Important: Tabs are small individual units that you see on the side panel.
Since we are just starting out, other than the layers tab, we don’t need any other tabs that exist on the side panel. And here is how you can remove them:
Click on the icon (see image below) that you see on the right side of the tabs, click on “Close Tab”. Clicking on “Close Tab Groups” will remove all the tabs in that row.

It’s ok if you have closed the layers tab also. You can get it back by going to the window (top menu) and then click on “Layers”.
And the only Tab that’s left on the side panel is the layers tab.
Imagine layers as a stack of papers. So what’s on the top is what you always see. But for example, if you have made the layer a bit transparent (it’s called opacity in photoshop), then you can see the layer beneath it.
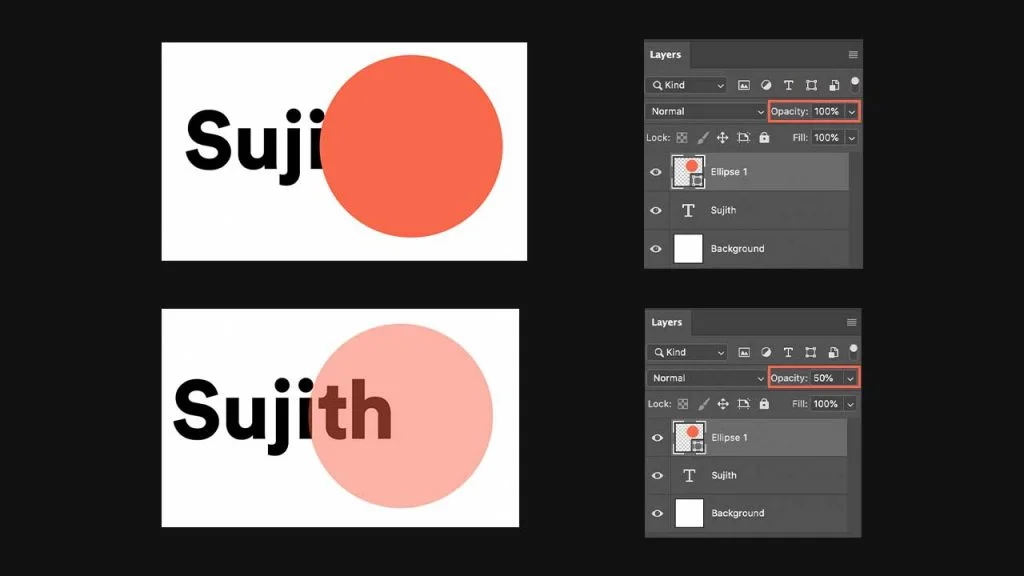
Now the reason why you can’t see my name (Hi, I am Sujith) is because of a circle (ellipse – check the layers panel) that is present above that. But once I’ve reduced the opacity of the circle to 50%, the “th” part is a bit (50%) visible.
So that’s how layers work.
I can select a particular layer, delete it, reduce the opacity, change the blend modes, increase the size of a particular layer, etc. Basically, layers give a lot of flexibility to tweak each graphic element when creating graphics in Photoshop.
Important: Make sure you name all the layers while creating designs so that you won’t get confused when you reopen the same PSD file a couple of days later.
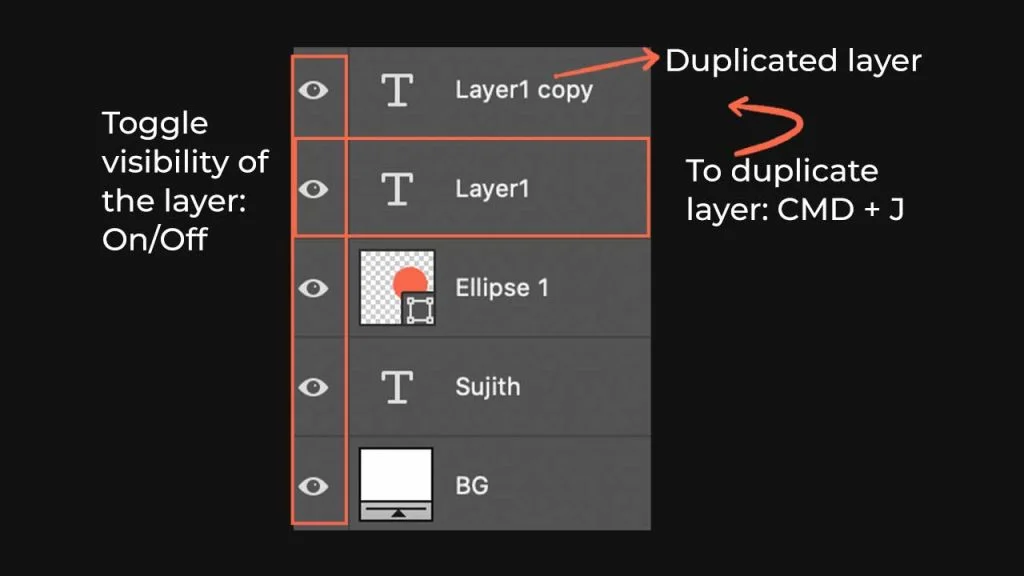
To duplicate a layer, you need to select that layer in the layers panel and hit CMD (CTRL) + J. And instead of deleting unwanted layers, you can click on the eye icon to hide the layer so that you can use it layer if needed. (See image above).
Anything that we see on digital media is basically created by colors, shapes, and text. So, let’s start with how we can create these things in Photoshop.
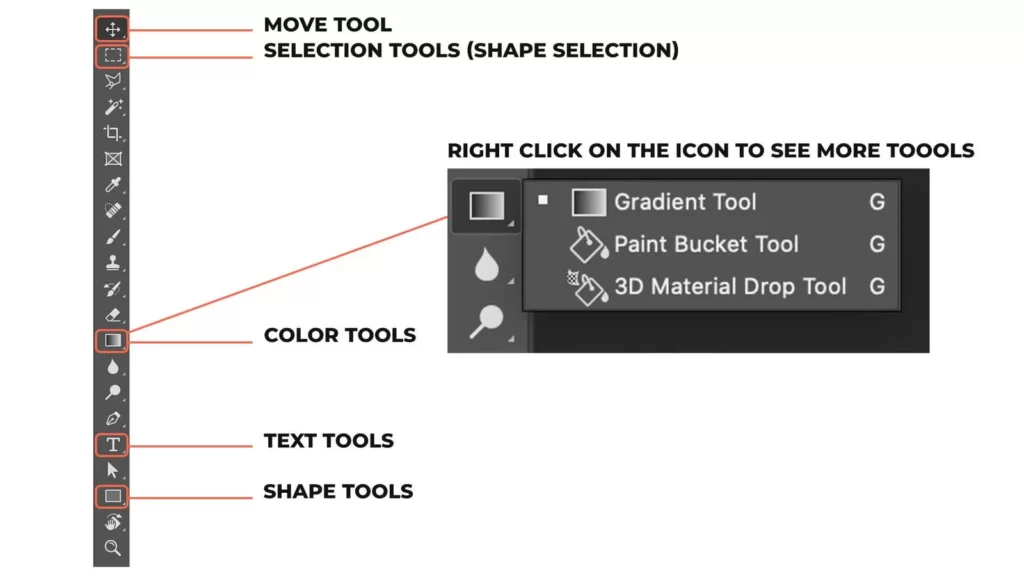
And here is an image that can help you locate the tools that I am gonna talk about:
Click on the text tool and start writing something on the Canvas (the white area). Once you are done writing, hit the escape button on the keyboard.
Now, to change the color, size, fonts, spacing, alignment, etc. you need to use the side panels which you can find on the right side. But if you can’t, go to the window (in the top menu) and choose Properties, Character, Paragraph (select them individually) and you’ll start seeing them popping up in the sidebar like this:
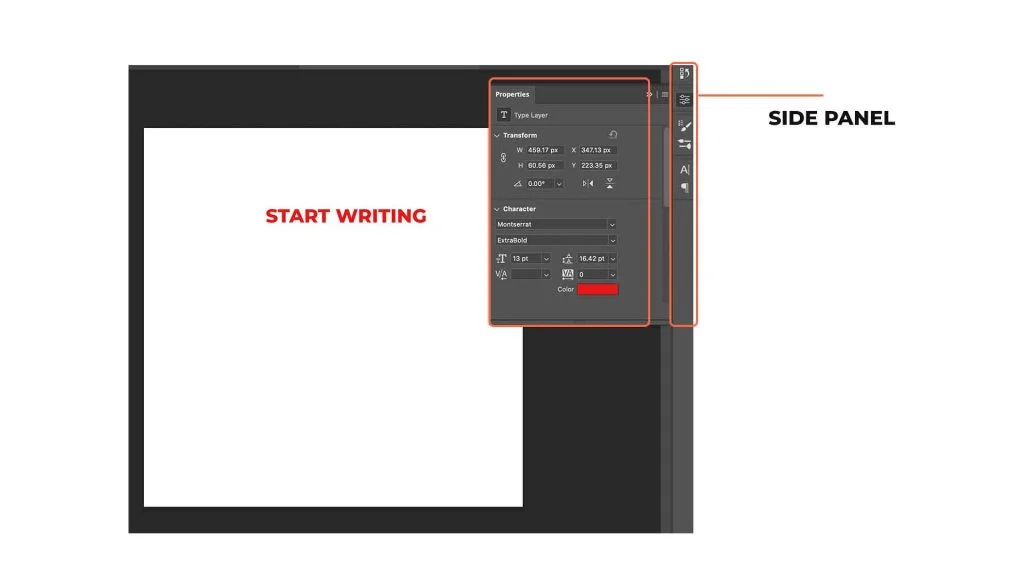
Now it’s just a matter of you tweaking the settings in these tabs: Paragraph, Properties, and, Character to get the desired result. You can change colors, spacing, alignment, etc. by tweaking the settings in these panels.
Reference: Photoshop Basics: Working with Text
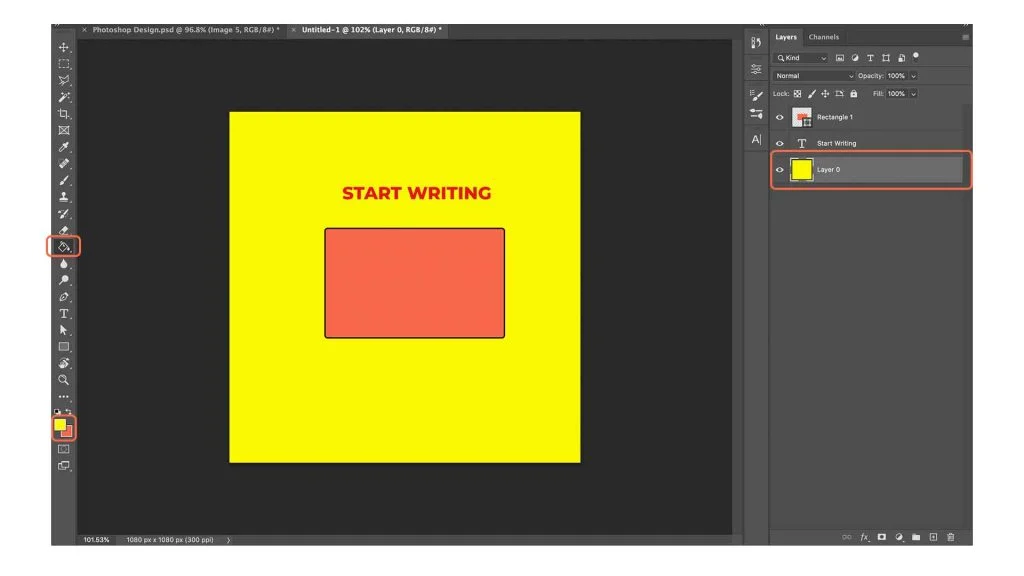
Click on the shape tool (refer to Image: Tools Overview) and draw on the canvas. You’ll get a rectangle. Now, to get a square, you need to hold shift and then draw (by draw I mean click and move the cursor on the canvas area). Now, you have the properties panel where you can add the fill, strokes, etc.

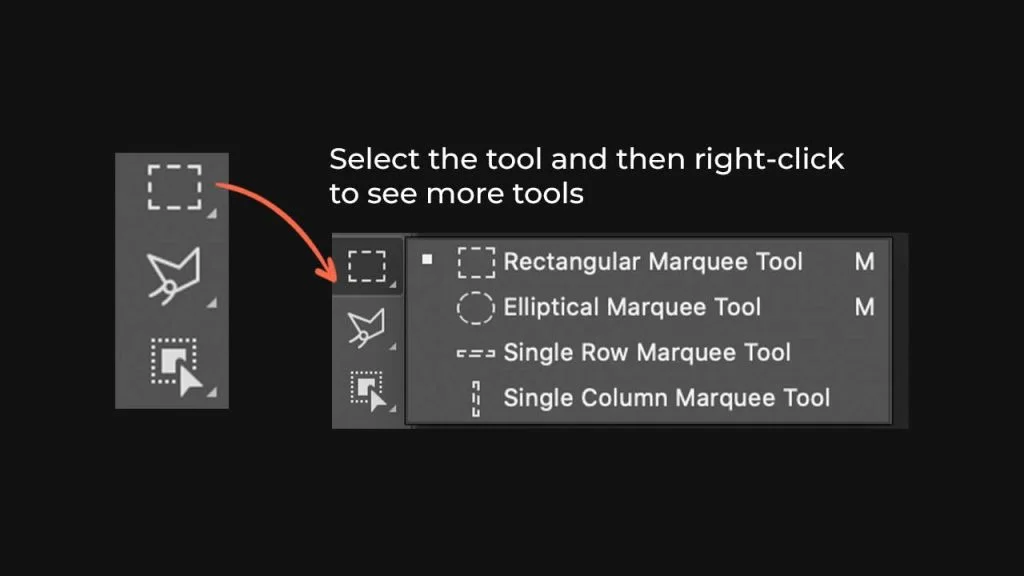
That’s it. That’s how you create shapes. Now, if you want to create a circle or polygon, right-click on the shape tool icon to see more tools and select the shape that you want to create.
Reference: Draw shapes with the shape tools in Photoshop
Now let’s see how we can add color to the Canvas. Choose the paint bucket tool (refer to image: Tools Overview) and choose layer 0 (in the layers section) and choose your favorite color (you can do this at the bottom section of the Tools panel). Once you have selected the color, a single click on the canvas will change the color.
Reference: Paint Bucket Tool Photoshop
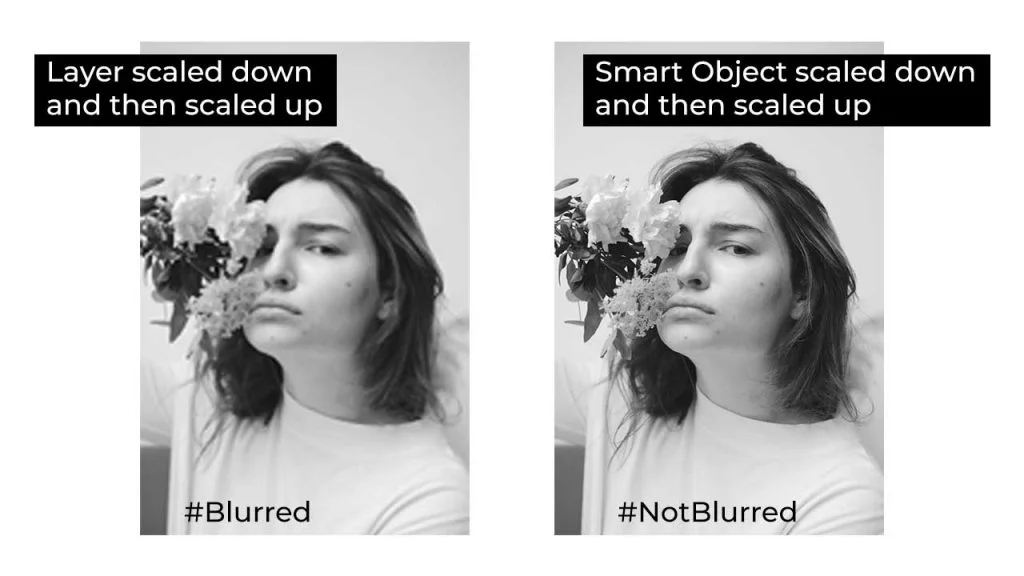
Smart Objects support non-destructive workflow and make things easier. Always import images as smart objects. Go to File (in the top menu) and click on “Place Embedded” or you can convert the image that you have imported in photoshop by right-clicking on the layer and clicking on “Convert To Smart Object”.
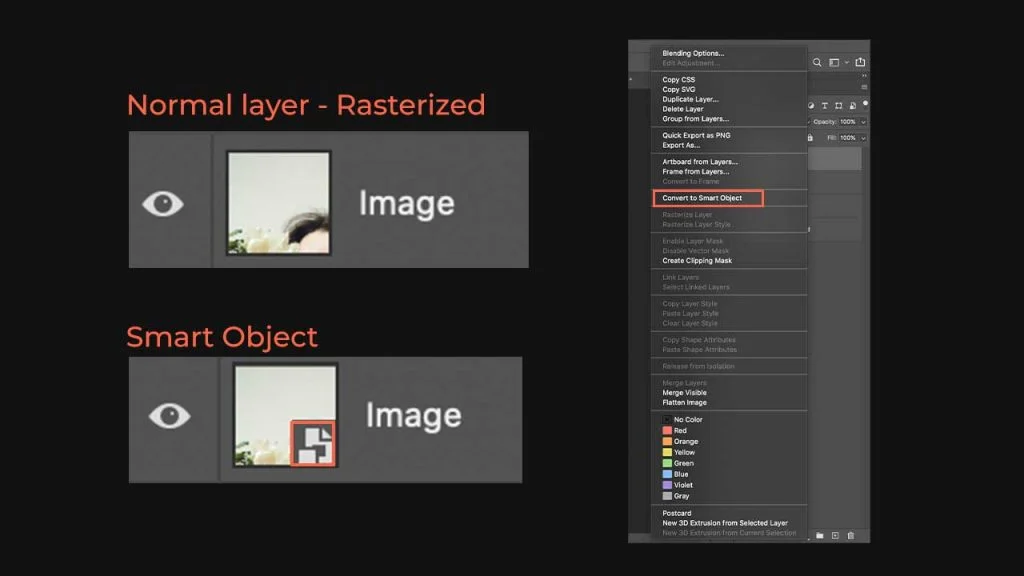
The reason why we do this when we scale images or graphics in your social media designs, the pixels might get messed up. Whereas if you scale up and down smart objects, that won’t happen.
Another big advantage of using smart objects is if you are using a lot of the same icons, shapes, etc basically repeated stuff in a design, then you can replace all of them with the new ones easily. Let me show you how:
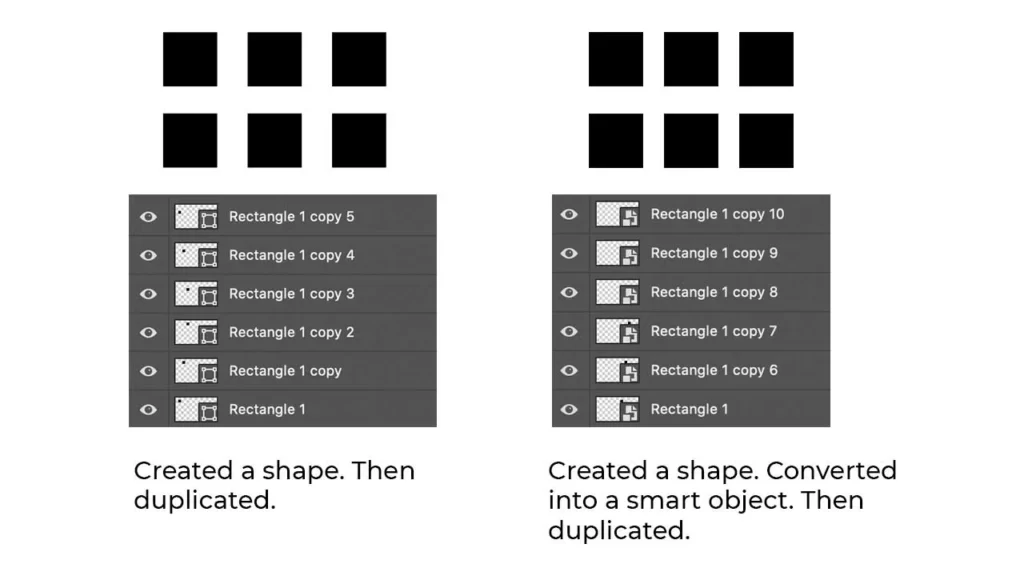
If I’ve just duplicated the squares (shapes), then I need to work on each of the shapes to make some changes. But in the case of smart objects, all I have to do is click double click on any layer. It’ll open up the new document in photoshop where I can make changes.

I’ve added a gradient. And saved the file. That’s it. All the other shapes got updated. Smart, right? So just make sure to use them.
Let’s say you want to increase the size of the text or rectangle that you’ve created. Obviously, you’ll click on the properties panel and will change the dimensions. But it’s hard to do that every time, putting in the numbers and checking if the size is ok or not.
The simplest way to change the size of anything is to select the layer that you want to scale, hit CMD+T (or CTRL+T), and then change manually.
If you hold Shift, you can scale the object equally in both directions.
If you hold ALT, you can scale the object equally in any one direction (horizontal or vertical).
If you select the layer that you want to transform and go to “Edit” (top menu) and “Transform”, there you’ll see a lot of options to transform like flip, skew, etc.
And remember to move things on the canvas from one place to another you can do that by using the move tool (shortcut – V).
Photoshop provides 3 different types of selection tools and in each type, there are more tools.
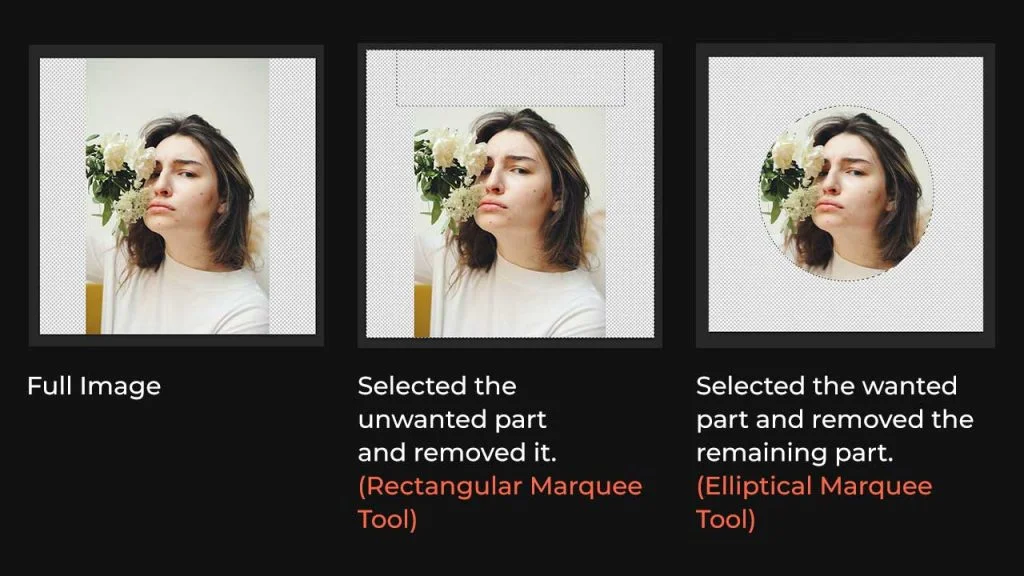
The rectangular and elliptical marquee selection tools and used to make the box type and circle (or ellipse) type selections. Check out their basic application in the example below:
To remove the parts that you don’t want, you can use the eraser tool and erase all the data. No matter what, when you have a selection, you can’t erase that. Once the erasing part is done, you can remove the selection with the shortcut CMD + D.
Note: To use the eraser on the layer, it has to be a rasterized layer. So, if the layer is a smart object, convert that into a rasterized one by right-clicking on the layer and choosing “Rasterize Layer”.
Lasso Tool: It is used for selecting something by freeform drawing on the layer.
Polygon Lasso Tool: It is used for selecting something by drawing straight-edged or polygonal shapes on the layer.
Magnetic Lasso tool: When you use this tool to select something the border snaps to the edges of defined areas in the image. This is used mostly to quickly select objects with complex edges.

The object selection tool is the easiest way to select an object in an image. Just draw a rough lasso (make sure the mode is set to lasso – check in the top panel) around the object and photoshop does most of the work.
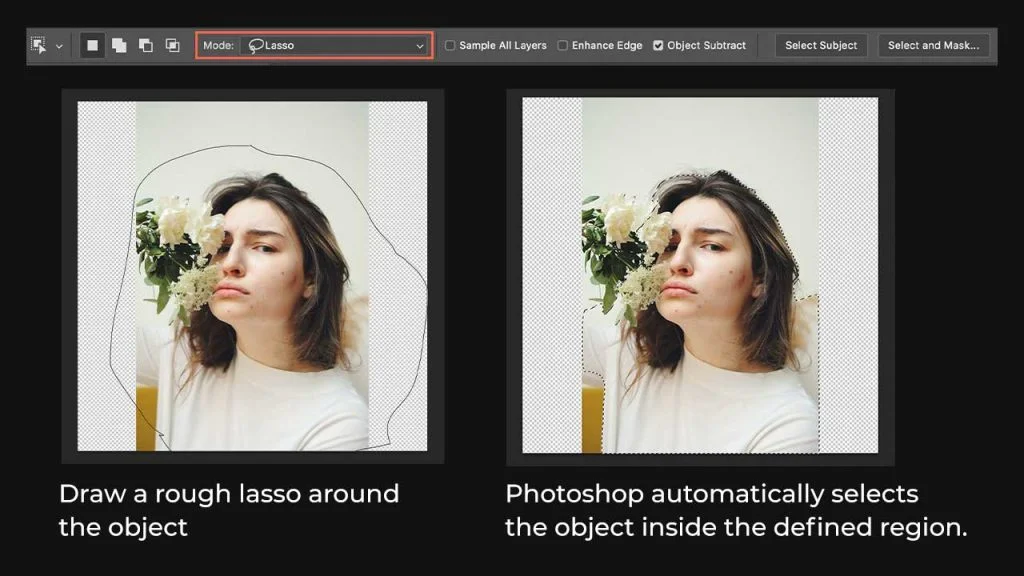
In our case, it did an “ok” job. Now to make the selection more precise, we will be using the quick selection tool.
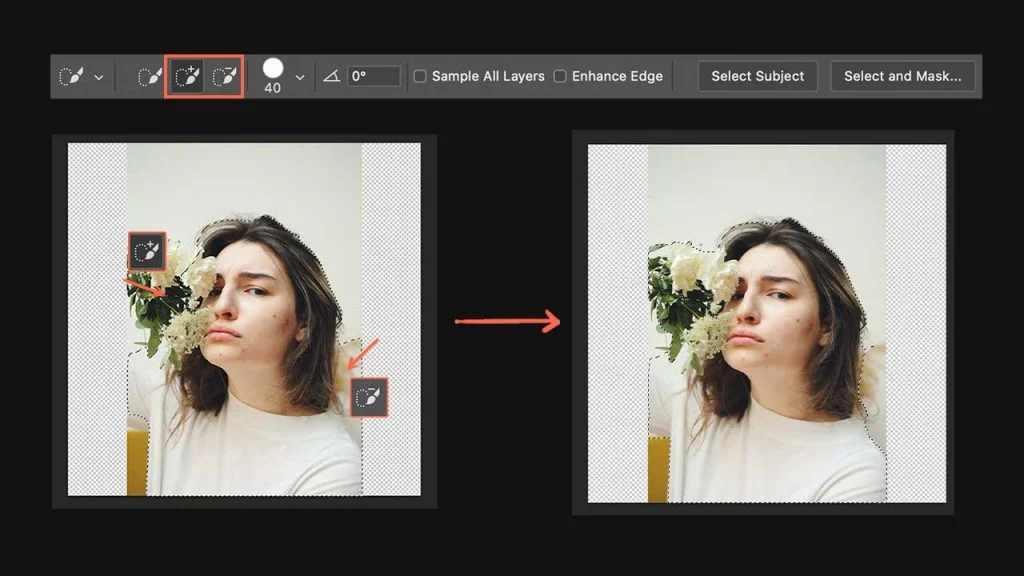
This selection tool works on the basics of click and drag. Select the quick selection tool (addition) then click and drag over the area that you want to add. Photoshop will automatically add the area by detecting the pixels around the dragged area.
If you want to remove the selection you can choose the negative selection tool (from the top panel) and drag on the area that you don’t want to include in your selection.
The magic wand tool selects the pixels in an image based on the color. So this tool is mostly used to select particular colors in an image.
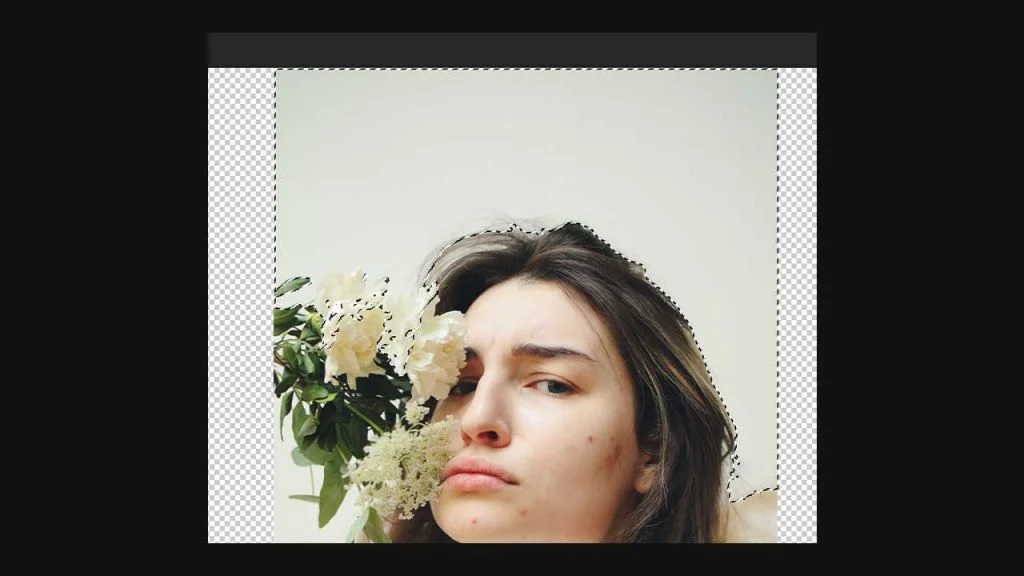
You can use the quick selection tool again to make the selection better.
So you might have understood that there is no such thing as a better tool when it comes to the different types of selection tools. In different cases, different tools will help you and make the design workflow easier.
Note: Whenever you see a checker pattern on the photoshop canvas, that means it’s transparent which means nothing is there.
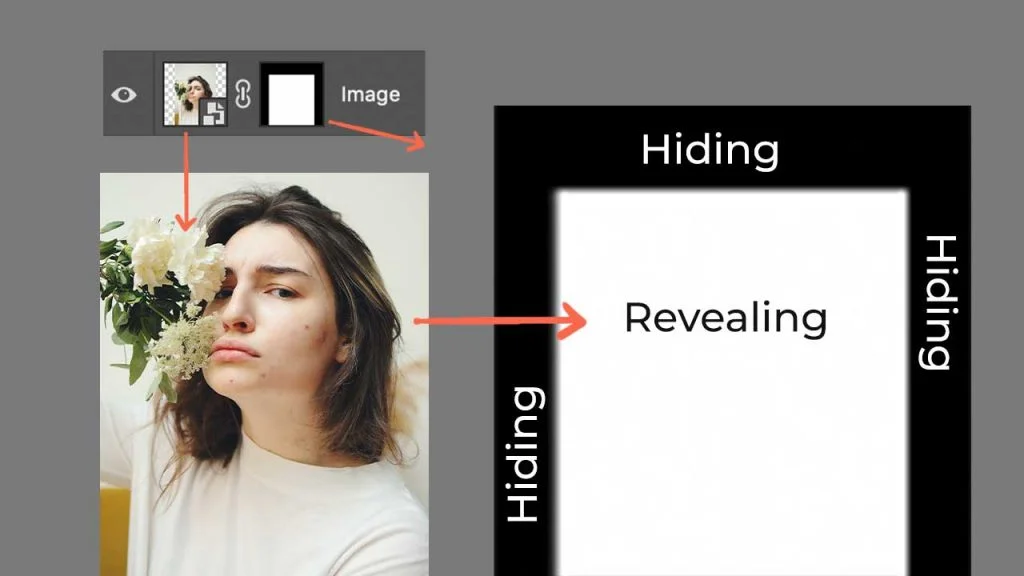
Now that you have understood how to make a selection using the various selection tools, let’s see how we can remove the data from the images without erasing it. So, what is a layer mask?
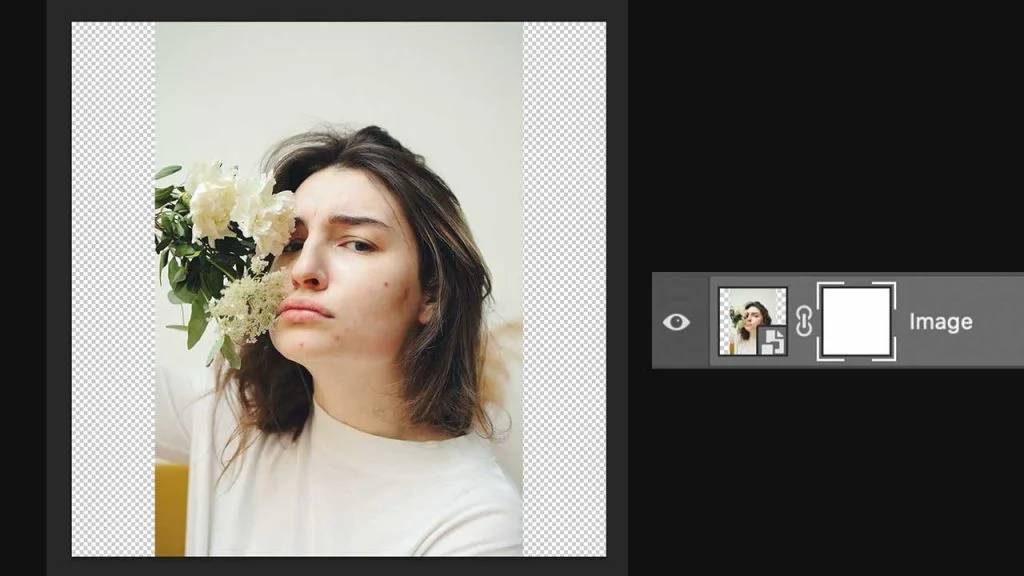
To explain this, I’ll be using the rectangular marquee tool to make a selection on the image (select only what’s needed). And then by selecting the image layer in the layers section, I’ll click on the “Add Layer Mask” icon that is located on the bottom panel.
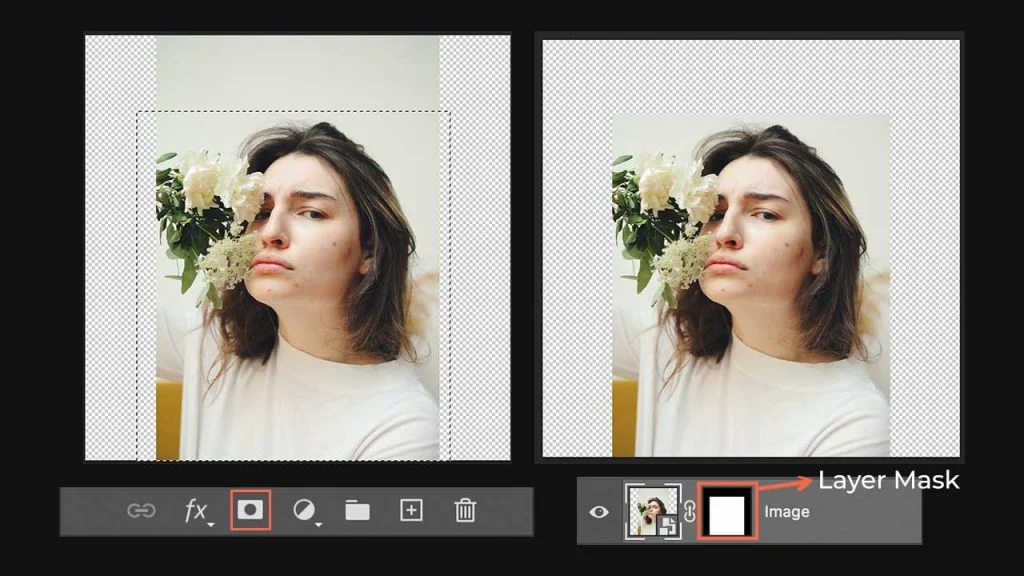
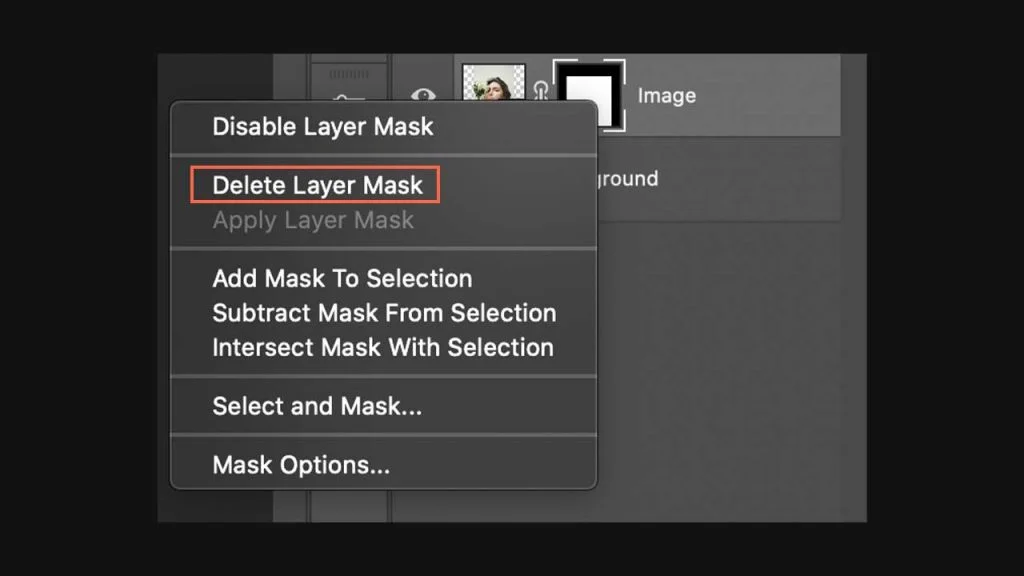
Now you can see that I’ve removed the top part of the image. But the point here is I didn’t erase it. I just hid it using a layer mask. Now, let’s say you have changed your mind and want that top part back. You can simply delete the layer mask by selecting it, right-click on it, and then select the “Delete Layer Mask” option.
Inside a layer mask, you can see the black and white colors. Black represents hiding and white represents not hiding or revealing. So now let’s correlate with the above example:
Still, confused? Let me give you one more example.
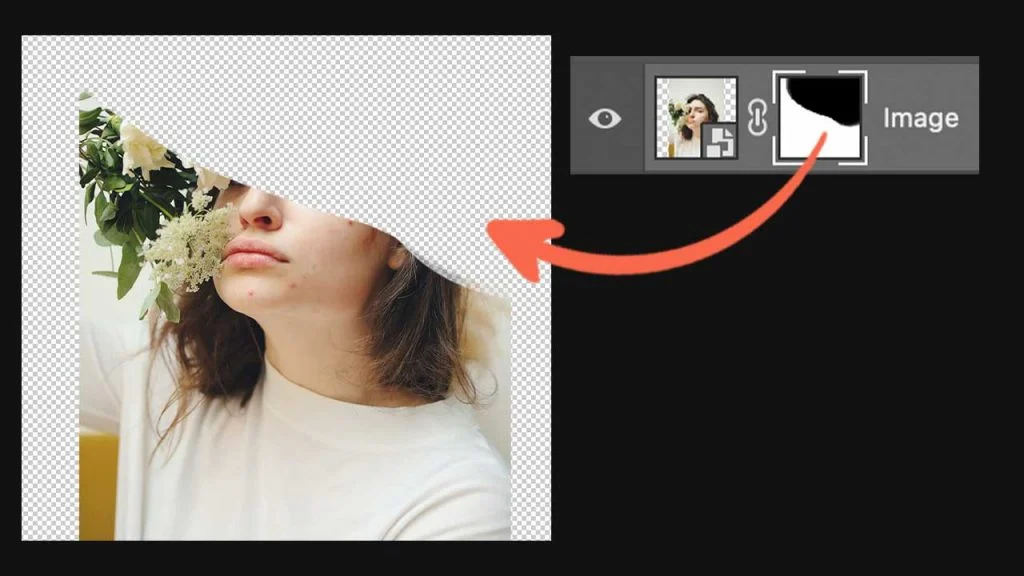
Now this time without creating any selection on the image, add a layer mask to the image layer.
Now take the brush tool (shortcut is “B”) and choose the color black. As you paint black on the canvas, you’ll see that the image stars disappearing. Why? Because black means hiding.
Unlike a layer mask which needs a selection to work, a clipping mask needs a shape. We have achieved this result using the layer mask. Right?

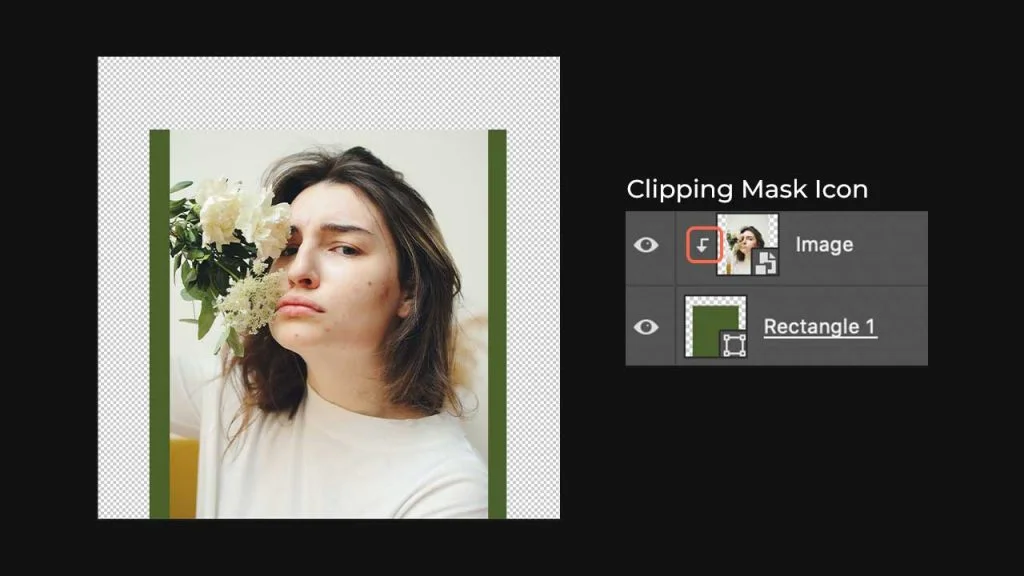
Now let’s see how we can achieve the same result using a clipping mask. So instead of making a selection, I’ll be drawing a rectangle over the image. And then I’ll bring the rectangle layer below the image layer in the layers panel. Remember this rule: Whatever stays on the top will get cropped and will fit into the below layer.
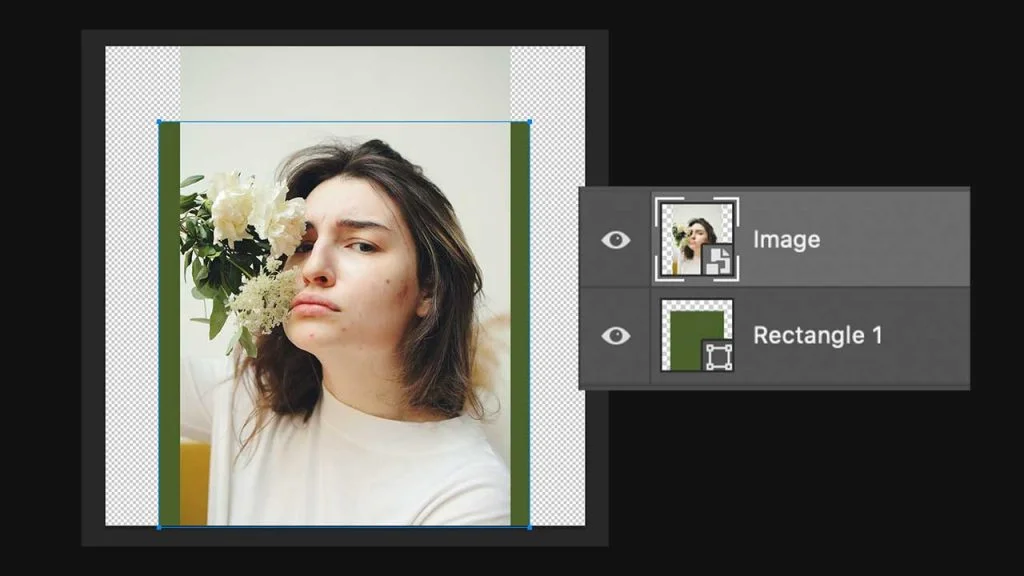
Now, all you have to do is click on alt (or option) and place the cursor in between both the layers in the layers panel. Once you see your cursor turning into an icon, click it! And the result will be:
Now, I can scale the image a bit more and reduce the size of the rectangle in the horizontal direction only. And that’ll give me this:
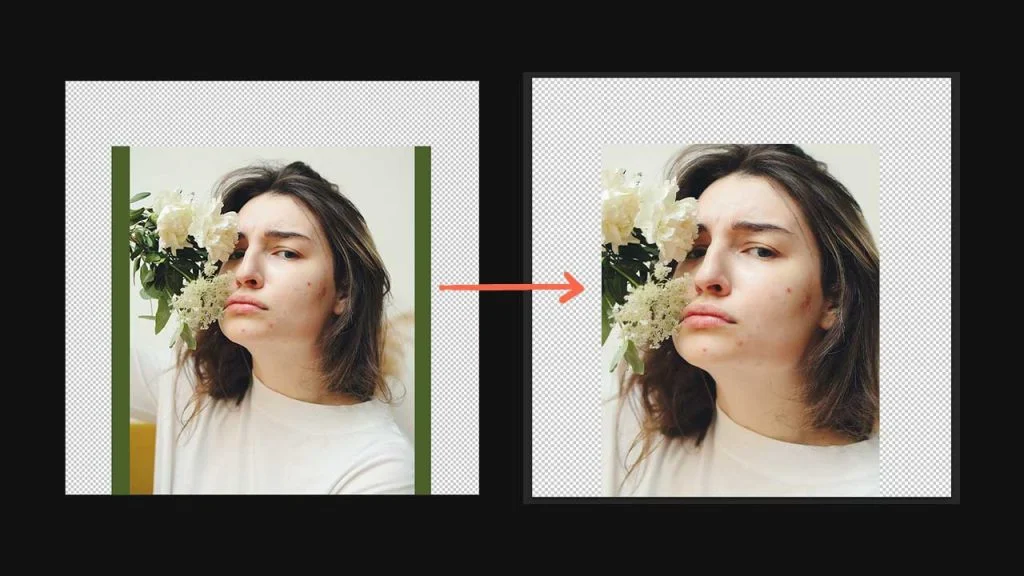
Now, why did I do this scaling thing? Just to show that’s the main advantage of using clipping masks. You can control how much you want to easily.
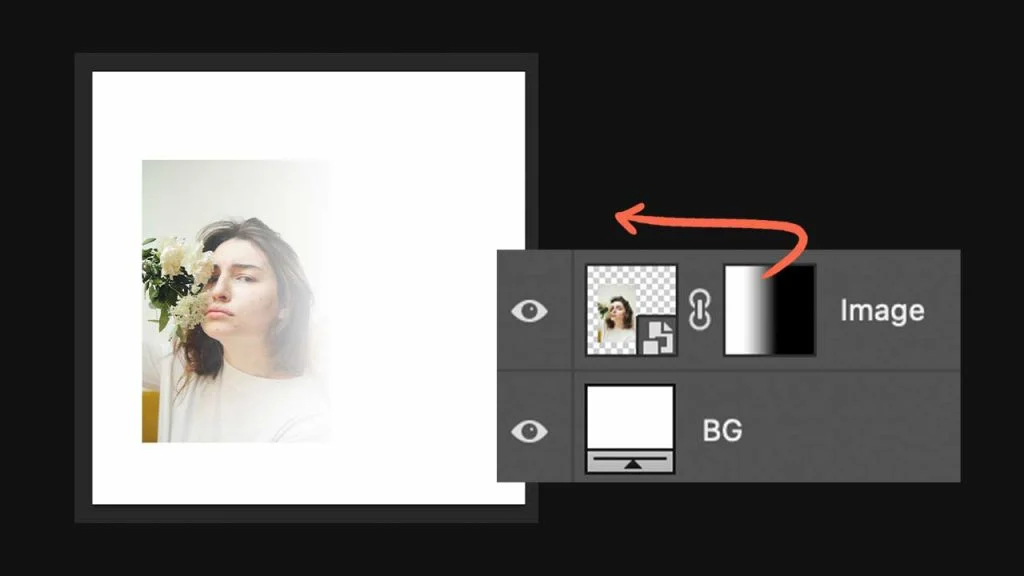
This is what Adobe says about Adjustment Layers: An adjustment layer applies color and tonal adjustments to your image without permanently changing pixel values. You can add those layers by clicking on the “Adjustment Layer” icon that is located on the bottom panel.
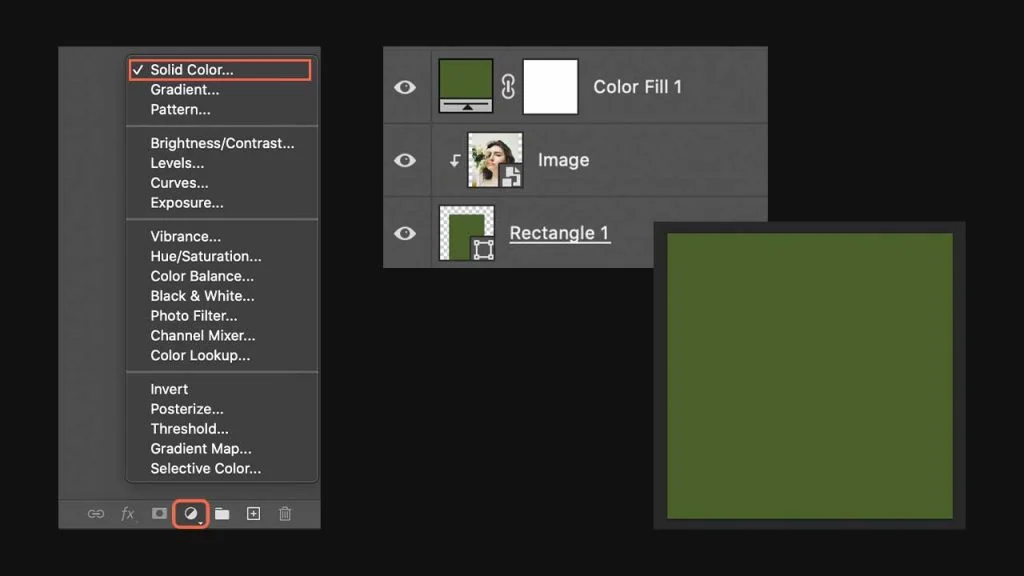
Let’s say in this case we have added a solid. Now, you can see that the solid has covered the entire canvas. Now to make it affect only the layer below, we can add a clipping mask, like this:
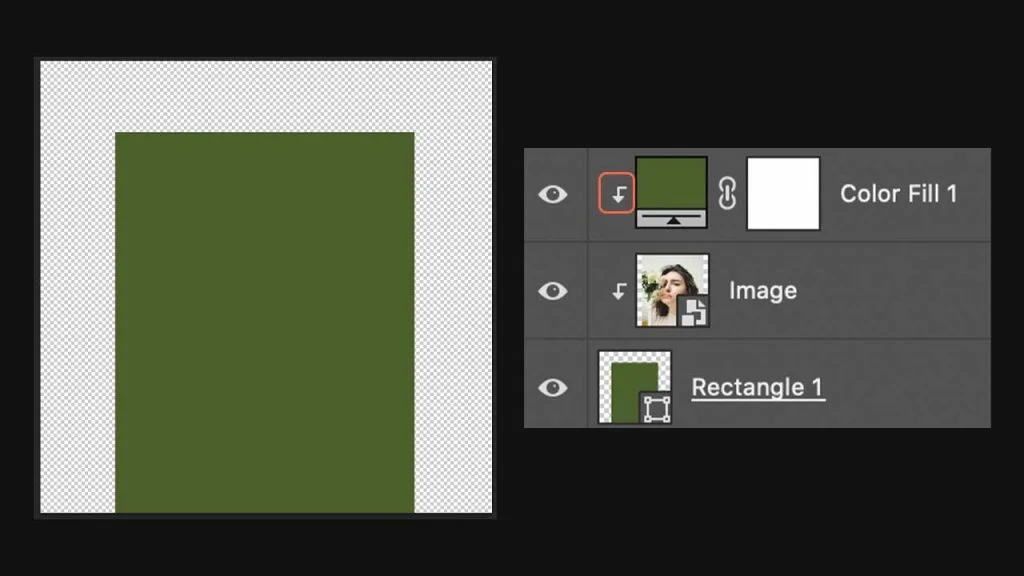
Now, the same can be done with other color correction effects and filters. And in each filter you can add a layer mask.
Total flexibility!
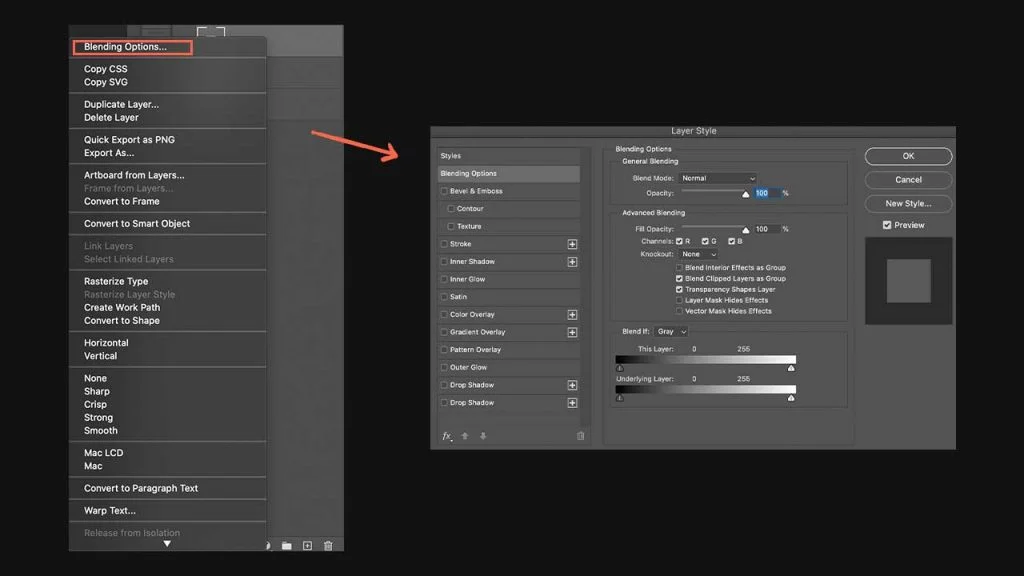
Blending options include a lot of features that can make your layer more attractive. For example, you can add a shadow behind the image or add a stroke to the text. Let’s see how we can do that.
Select the text layer, right-click on it, and choose blending options.
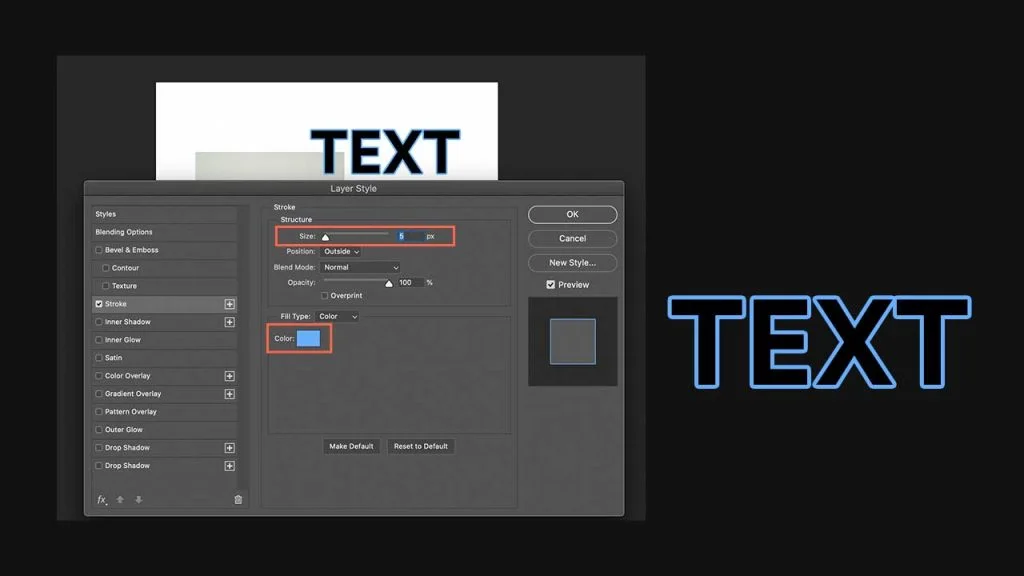
Now, click on stroke and change the color and size.
Now, select the image layer. This time, we’ll try drop shadow in the blending options section.
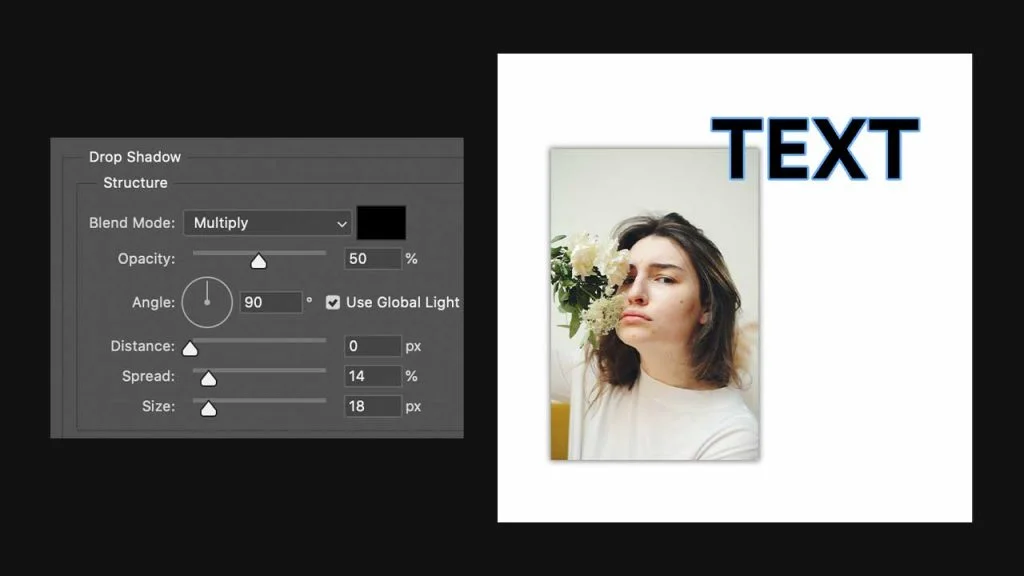
These are just some of the few effects that you can try using the “Blending Options”.
Now that you are clear with the main concepts and tools that can help you when you start designing social media graphics, here are solutions to some common questions most beginners ask.
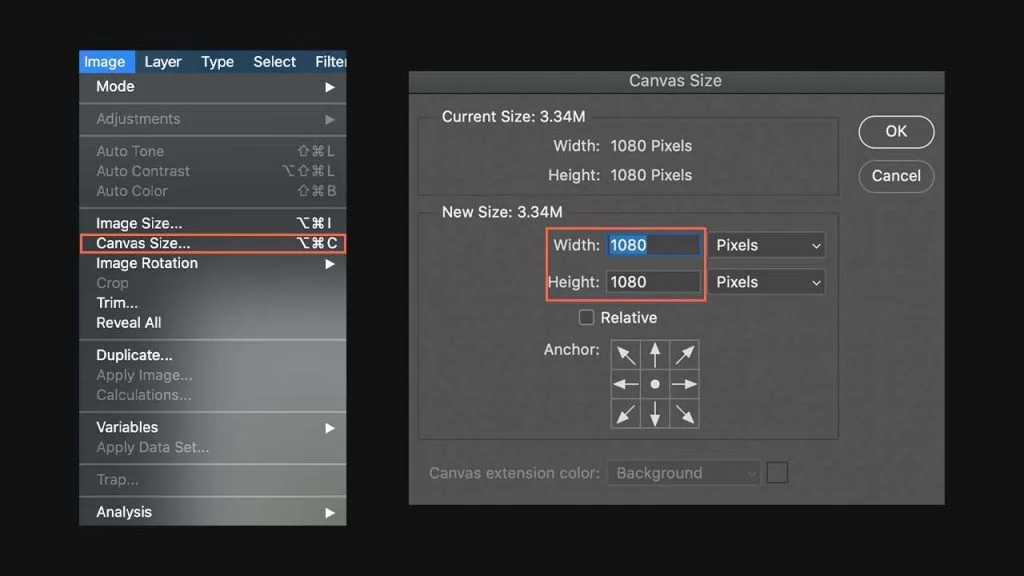
If you want to resize social media graphics, you need to know how to change the canvas size. By resizing I mean converting an Instagram post into a Pinterest pin, or a Facebook post, something like that.
To do this, go to Image in the top menu and click on “Canvas Size”. A window pops up. And enter the values in pixels based on the social platform you want to resize the content for.
The gradient tool lies along with the paint bucket tool. Hit “G” to select that tool and right-click on it and then choose the “Gradient Tool”. Now, click on the gradient that you see on the top panel. A new window will pop up.
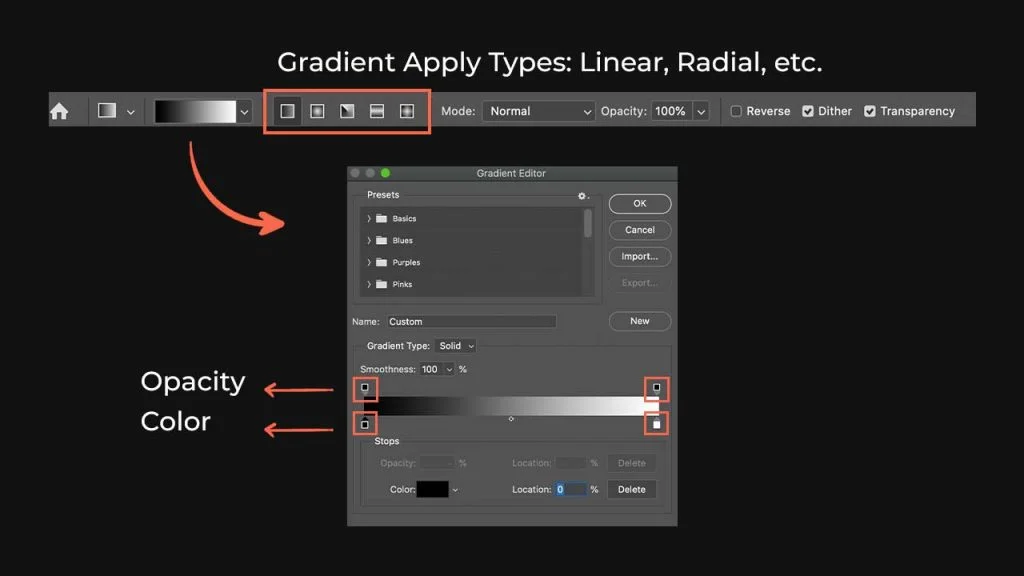
Choose the colors and opacity values on both sides as per your needs and click on “Ok”. Now, all you need to do is click and drag on the screen.
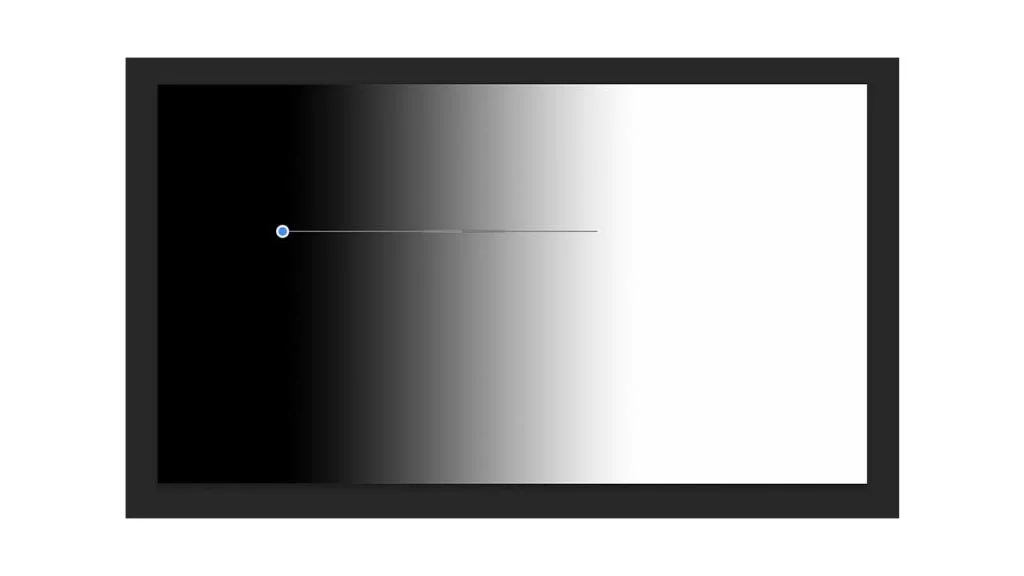
You can use this tool to apply a fade effect or to blend images by applying the gradient inside the layer mask of the image.
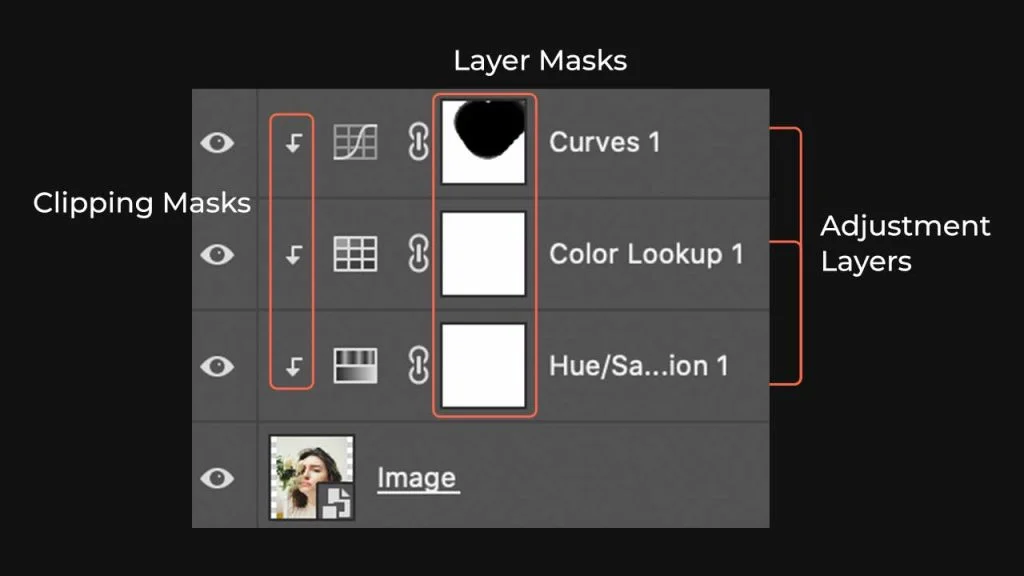
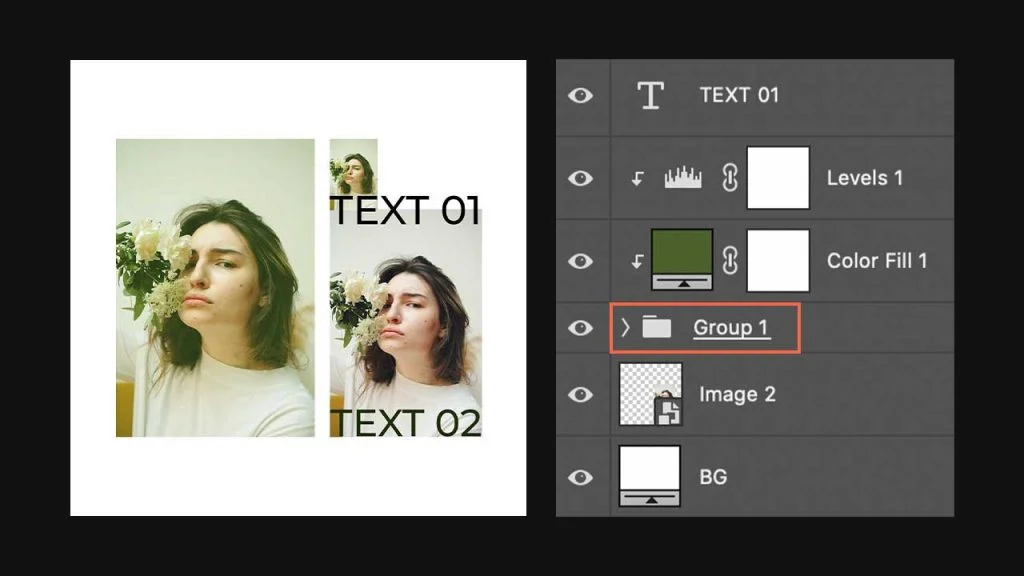
I’ve already talked about naming and organizing the layers. But one thing I didn’t talk about is grouping layers. To group layers, first, select the layers that you want to group and hit CMD (CTRL) + G.
Groups come in handy when you want to move a selected number of layers or apply effects to a few layers only. So, in this example below, you can see that the adjustment layers (Levels, Color Fill: 50% opacity) are affecting all the layers.
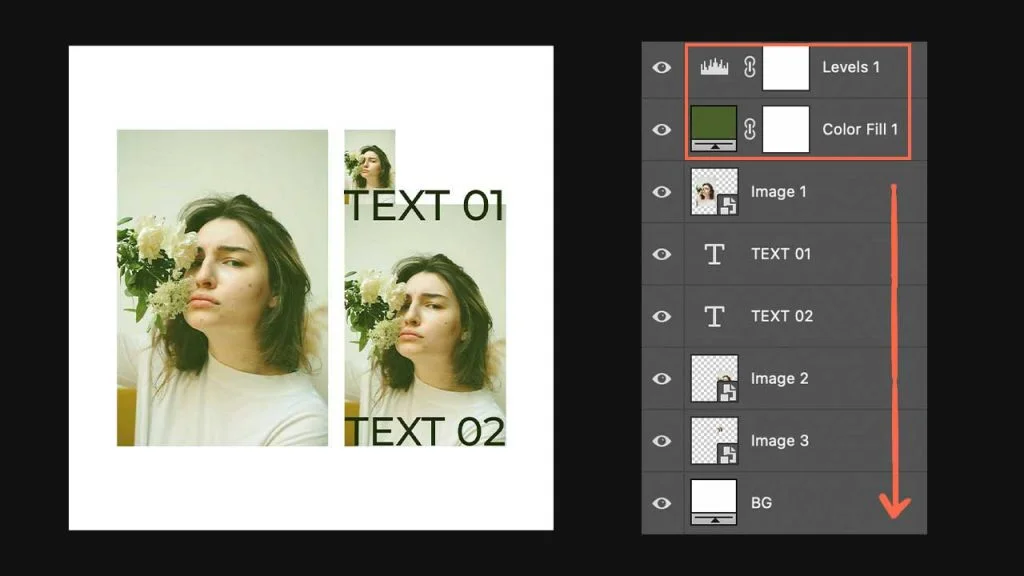
Now, if I want these adjustment layers to only a few layers like Image 1, Image 3, and Text 02 then all I need to do this group them and then apply the clipping mask.
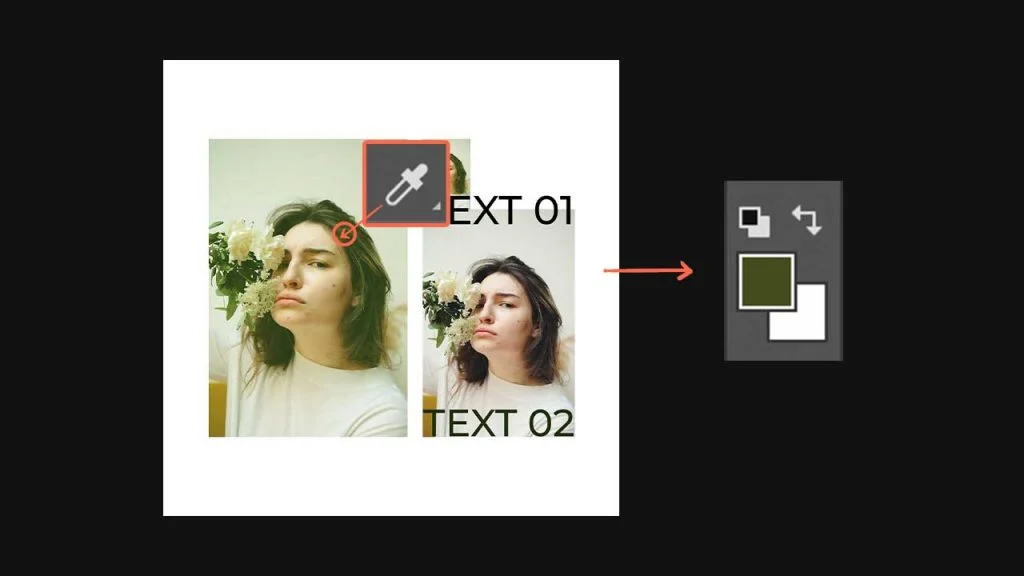
If you want to use a color from any image or graphic or anything that you have on the canvas, you can select the Eyedropper tool (shortcut – I) and click on the area that you want to copy the color.
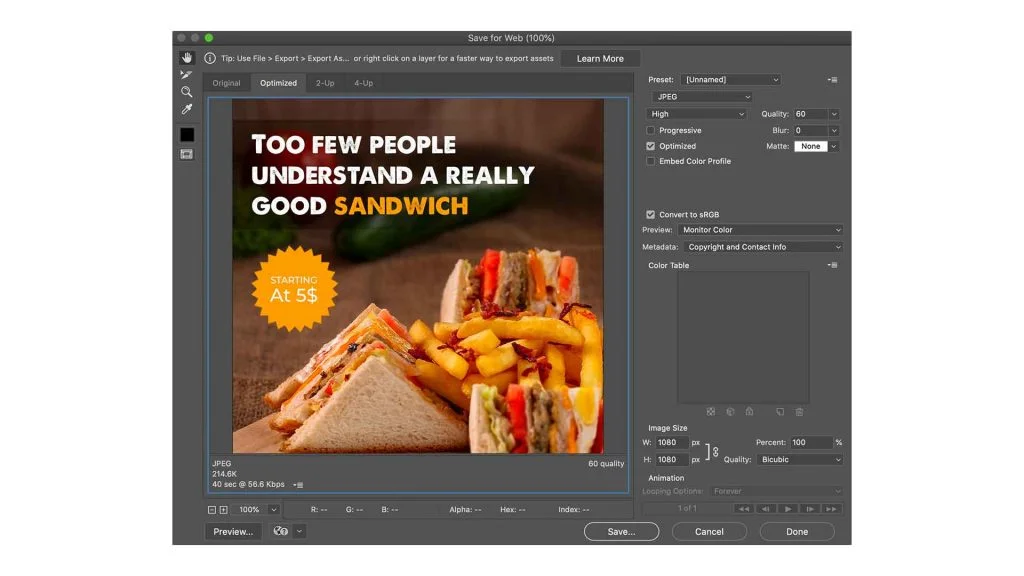
Go to “File” in the top menu and then click on “Export” and choose “Save For Web”. Or simply hit CMD + Shift + S directly. This will open a new window where you can change the file types and resolution and then click on “Save”.
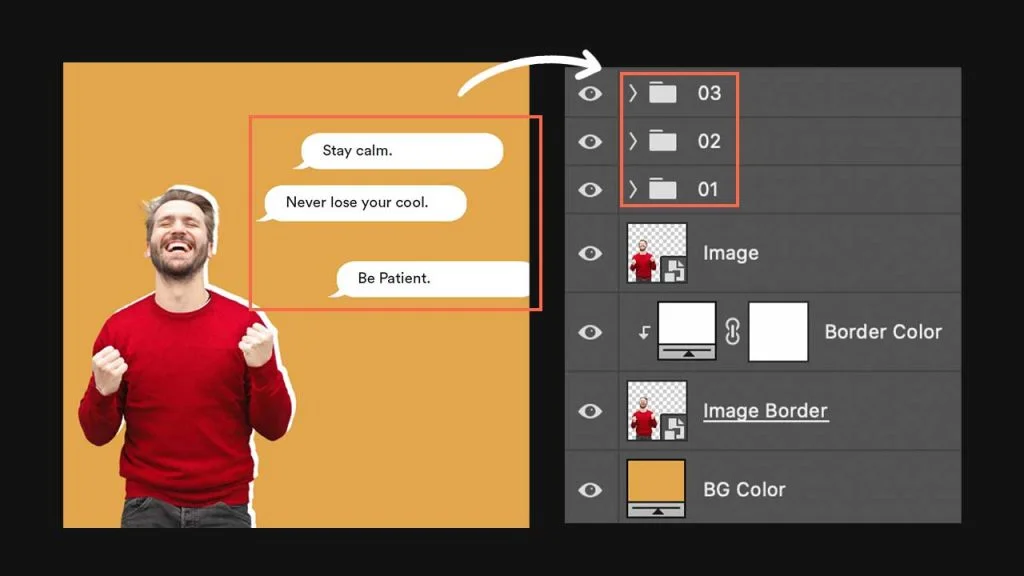
Alignment and Distribution are something that you should master for sure especially when dealing with social media graphics. If you are putting a lot of content (text, images, icons, logo) on the graphic, you need to make sure that they are well distributed and aligned.
In the image below, since I want them to align each message element to the left and distribute them equally, I have created groups for each. For example, group “03” consists of a white message box and “Stay calm” text.
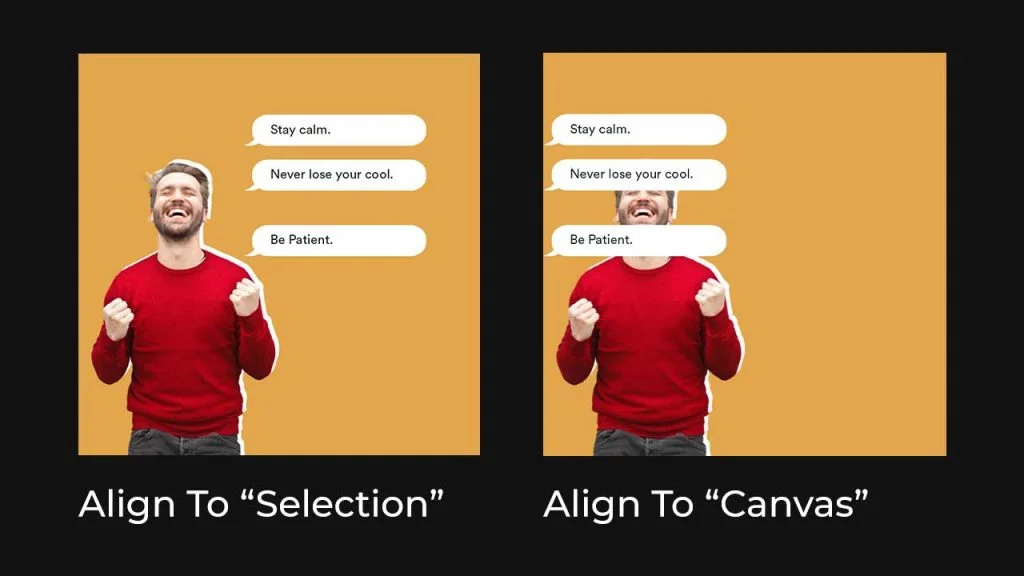
Now that I need to align these groups to the left, all I need to do is select those groups (01, 02, 03). In the top panel, you can see the Align settings.

Now if you change the “Align To” option to canvas and then hit the align left icon, then all the groups will get aligned to the canvas like this:
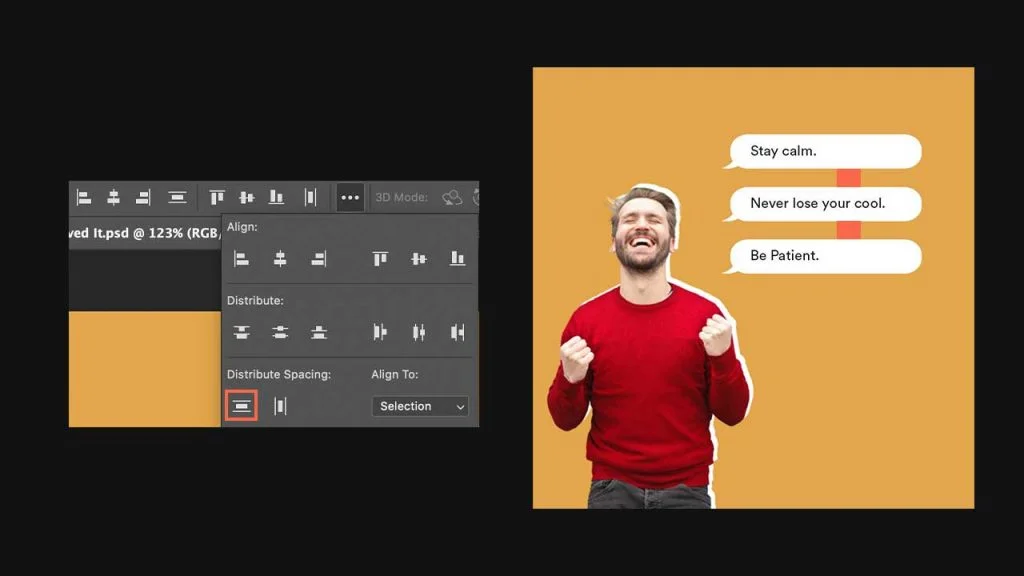
Now, to distribute these groups equally (to achieve equal spacing between these groups vertically), all I have to do is select the groups and click on “Distribute Vertically”.
Related: 8 Powerful Designs Tips To Create Eye-Catching Visuals For Social Media
Now that you’ve got to know all the basics of this powerful design tool, you just need to apply them. But the thing is you need to have a certain framework on where to put what kind of graphics, how to come up with creative ideas, etc.
So, I recommend you to learn the design process that I follow while designing social media posts. And after that read this article (skip the basics part as you already learned that here) where I talked about how to create graphics using photoshop with an example.
Basically what I am saying is you have a lot of work to do. Practice! Practice! Keep the learning process slow and steady. You’ll be good to go.
3 Comments
30 Photoshop Shortcuts To Help You Create Social Media Content FastJuly 21, 2021
[…] PS: To learn and remember things that I’ve mentioned in this article, you need to be familiar with Photoshop. If you are not, you can read the photoshop basics article. […]
5 Tips To Come Up With Creative Designs For Your Social MediaJuly 21, 2021
[…] Related: A Beginners Guide To Adobe Photoshop For Social Media Designing […]
How To Create Your Own Social Media Templates In PhotoshopJuly 21, 2021
[…] need to know the basics of photoshop for you to understand this. If you don’t know, you can refer to this article and make yourself familiar with the basic panels, tools & their functions of this powerful […]