
Adobe Photoshop is one of the most powerful photo editing and manipulation tools and is considered the industry standard. But, it’s also very powerful in terms of creating stunning graphics for marketing purposes.
And most importantly, it just costs only 10 bucks per month (The Adobe Photography Plan costs $9.99 per month and you’ll get both Photoshop and Lightroom with the plan).
I’ve been using photoshop for 5 years and since then never thought of switching to any other online tool like Canva or Desygner.
The only con of photoshop is if you are a beginner, it’ll take a lot of time to learn and understand the tools & features. Trust me, I was there. So, that’s why I’ve written this guide keeping beginners in mind.
But, why face this much struggle learning a new tool when can I can use any other easy to use online tool?
If you are in the marketing space, by now you might have understood that design matters a lot in social media. It ain’t 2010 and it’s not easy to grab attention by just posting some mediocre graphics on social media.
I think that’s why it’s worth putting in the time to learn photoshop especially if you are not looking to outsource designing.
So, my goal in this article is to teach you how to design stunning social media graphics with photoshop. And after reading this article completely I’m pretty much sure that you’ll be able to design your own content for social media.
Like I’ve said, Photoshop can be very intimidating for beginners. But that’s only when you try to use and learn everything that photoshop offers. So, I’m gonna talk about only the basic tools and features that you need to know to design a creative for your brand.
But before that, do this:
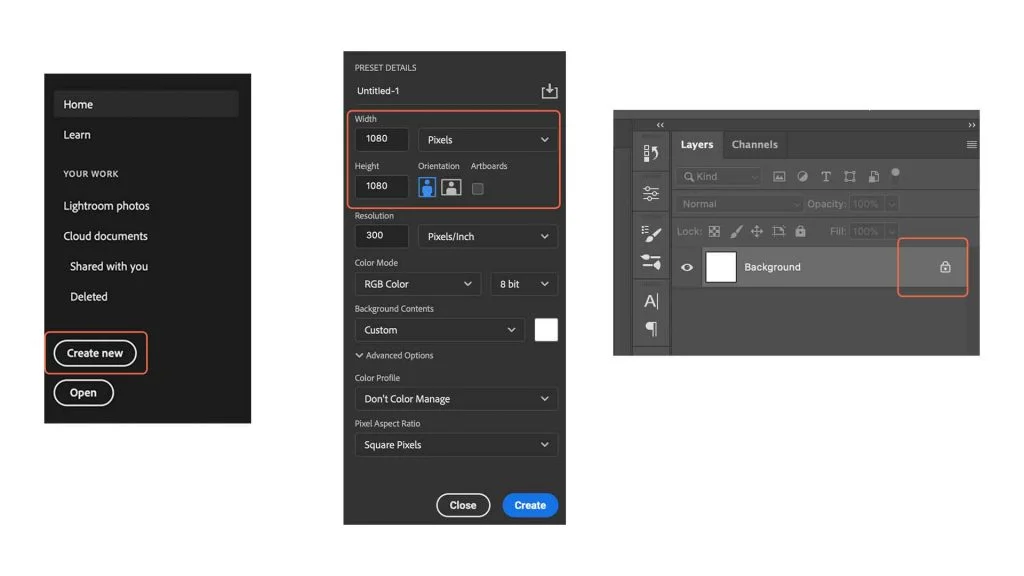
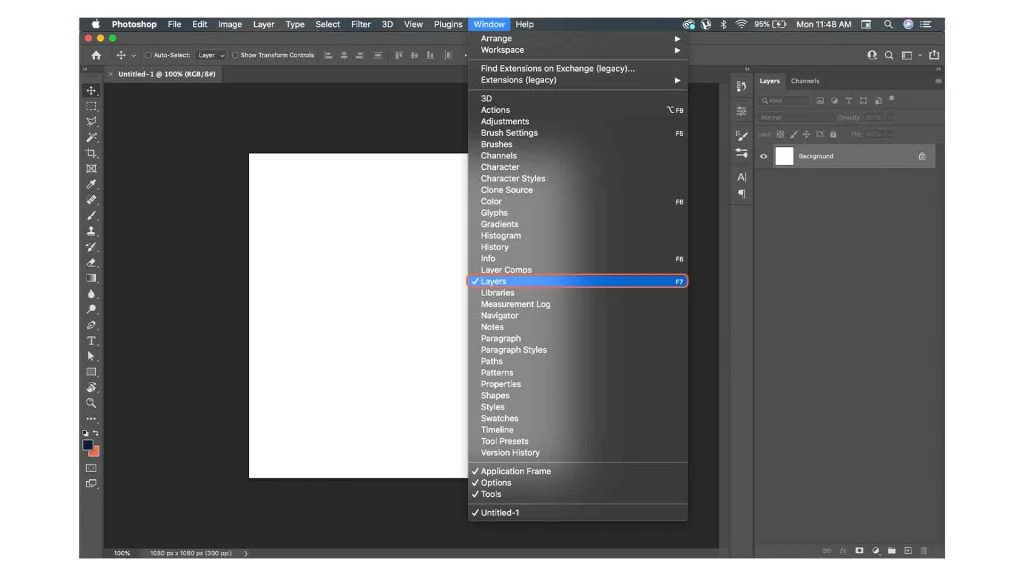
Couldn’t find layers panel? On the top menu, click on Window and then click on Layers in the dropdown menu.
Now that I’ll be talking more about the basic tools in this section, here is an image pointing out different tools, just for you to identify them visually.

Anything that we see on digital media is basically created by colors, shapes, and text. So, let’s start with how we can create these things in Photoshop.
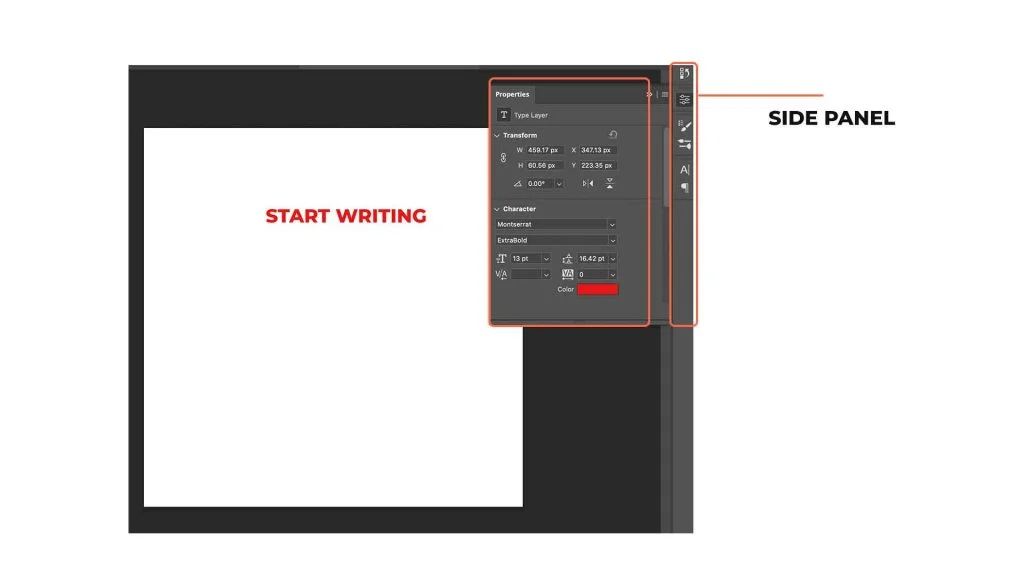
Click on the text tool and start writing something on the Canvas (the white area). Once you are done writing, hit the escape button on the keyboard.
Now, to change the color, size, fonts, spacing, alignment, etc. you need to use the side panels which you can find on the right side. But if you can’t, go to the window (in the top menu) and choose Properties, Character, Paragraph (select them individually) and you’ll start seeing them popping up in the sidebar like this:
Now it’s just a matter of you tweaking the settings in these tabs: Paragraph, Properties, and, Character to get the desired result. You can change colors, spacing, alignment, etc. by tweaking the settings in these panels.
Reference: Photoshop Basics: Working with Text
Click on the shape tool (refer to Image: Tools Overview) and draw on the canvas. You’ll get a rectangle. Now, to get a square, you need to hold shift and then draw (by draw I mean click and move the cursor on the canvas area). Now, you have the properties panel where you can add the fill, strokes, etc.
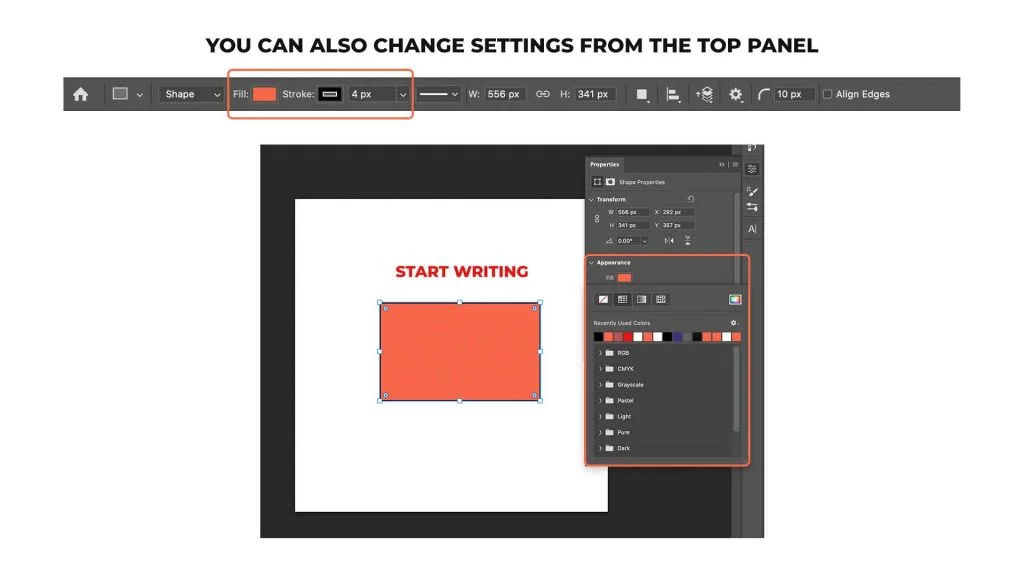
That’s it. That’s how you create shapes. Now, if you want to create a circle or polygon, right-click on the tool icon (refer to image: Tools Overview) and select the shape you want to create.
Reference: Draw shapes with the shape tools in Photoshop
Now let’s see how we can add color to the Canvas. Choose the paint bucket tool (refer to image: Tools Overview) and choose layer 0 (in the layers section) and choose your favorite color (you can do this at the bottom section of the Tools panel). Once you have selected the color, a single click on the canvas will change the color.
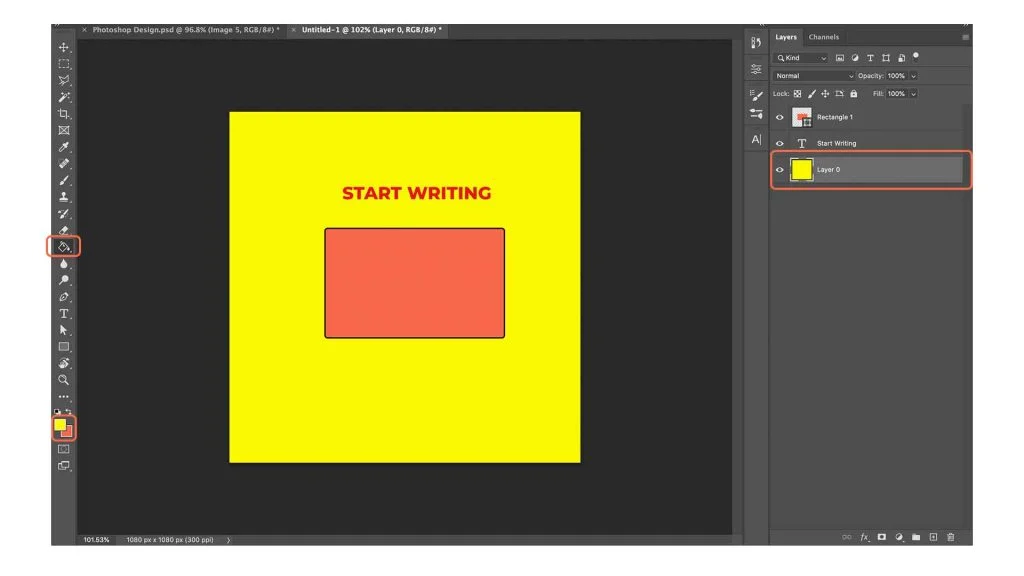
Reference: Paint Bucket Tool Photoshop
Let’s say you want to increase the size of the rectangle. Obviously, you’ll click on the properties panel and will change the dimensions. But it’s hard to do that every time, putting in the numbers and checking if the size is ok or not.
The simplest way to change the size of anything is to select the layer that you want to scale, hit CMD+T (or CTRL+T), and then change manually.
If you hold Shift, you can scale the object equally in both directions.
If you hold ALT, you can scale the object equally in any one direction (horizontal or vertical).
Now, coming to layers..what actually is a layer in photoshop?
According to Adobe: Photoshop layers are like sheets of stacked acetate. You can see through transparent areas of a layer to the layers below. You move a layer to position the content on the layer, like sliding a sheet of acetate in a stack.
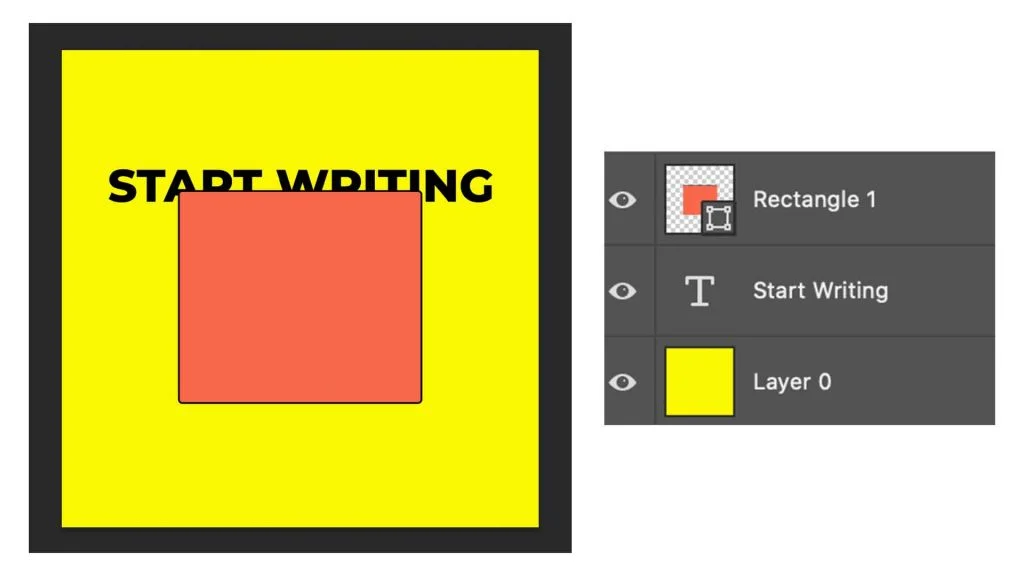
So basically you view these layers from the top of the stack. So if you want to add text to the image then the text should be on the top, and the image should be below the text layer. In the below example, since the text layer is below the rectangle layer, the text isn’t fully visible.
The top three sections below the Move tool in the tools panel come under selection tools. But let’s start with the basic one. The Marquee selection tool like the shape tool has multiple variations. Let’s choose the rectangle Marquee selection tool for now. Select Layer 0 and draw a rectangle around the text.
Now choose the paint bucket tool, select a color and paint on the area.
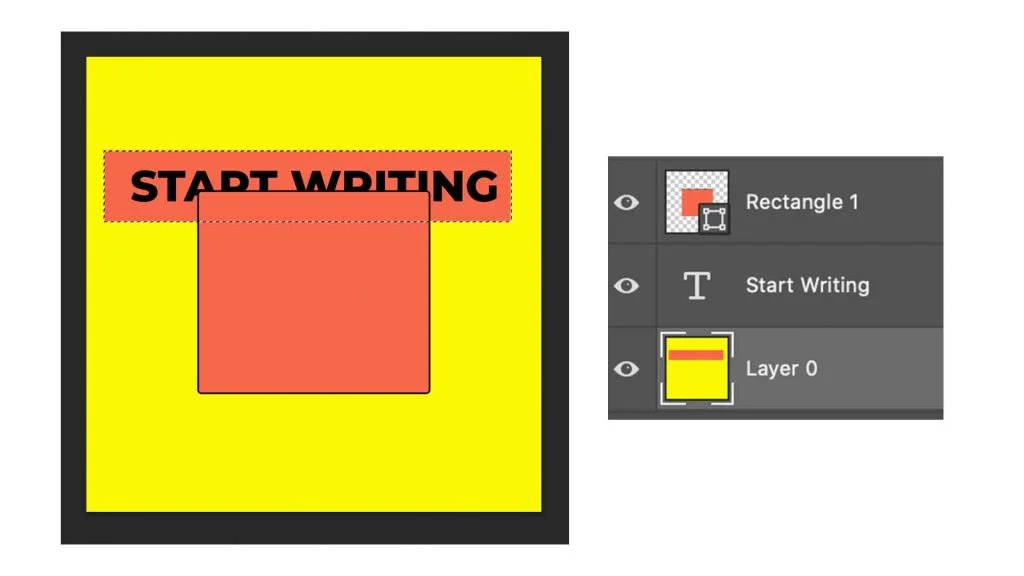
Now you might be thinking, why not just draw a rectangle using the shape tool instead of making a selection and adding the color. Well, both are correct. But I’ve explained the selection process only to make layer masks easy for you which we are gonna talk about in the next section.
Reference: Photoshop selection tools basics
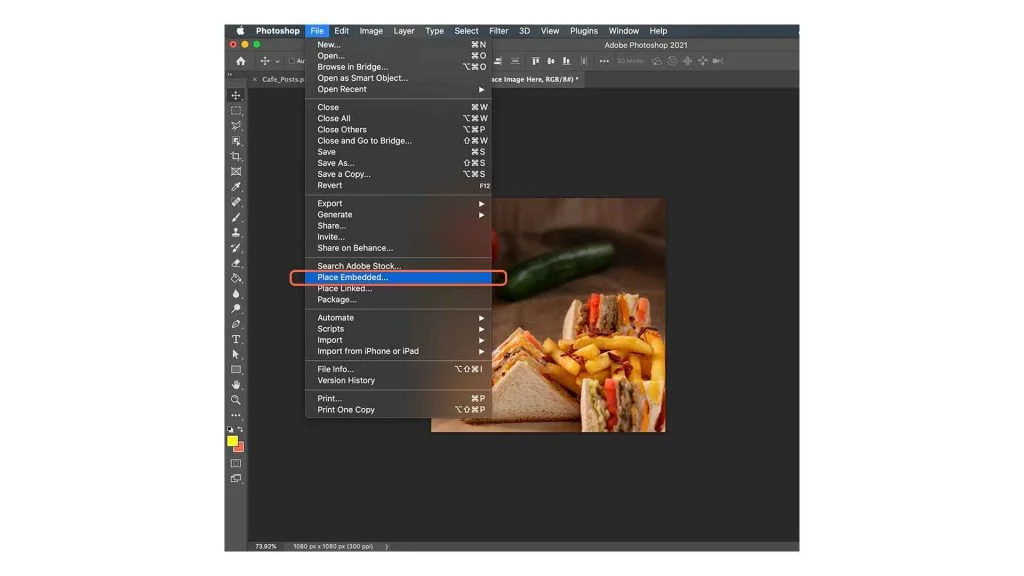
To explain these concepts, let’s import an image into the photoshop document. Go to file (top menu) and then click on Place Embedded and choose the image. Once imported into the document, hit ENTER.
Now, the goal is to place the image in the rectangle that we already have. So, in the layers panel bring the rectangle below the image layer. Remember this rule: Whatever stays on the top will get cropped and will fit into the below layer.
Once you’ve arranged the layers all you have to do is click on alt (or option) and place the cursor in between both the layers in the layers panel. Once you see your cursor turning into an icon, click it! And the result will be:
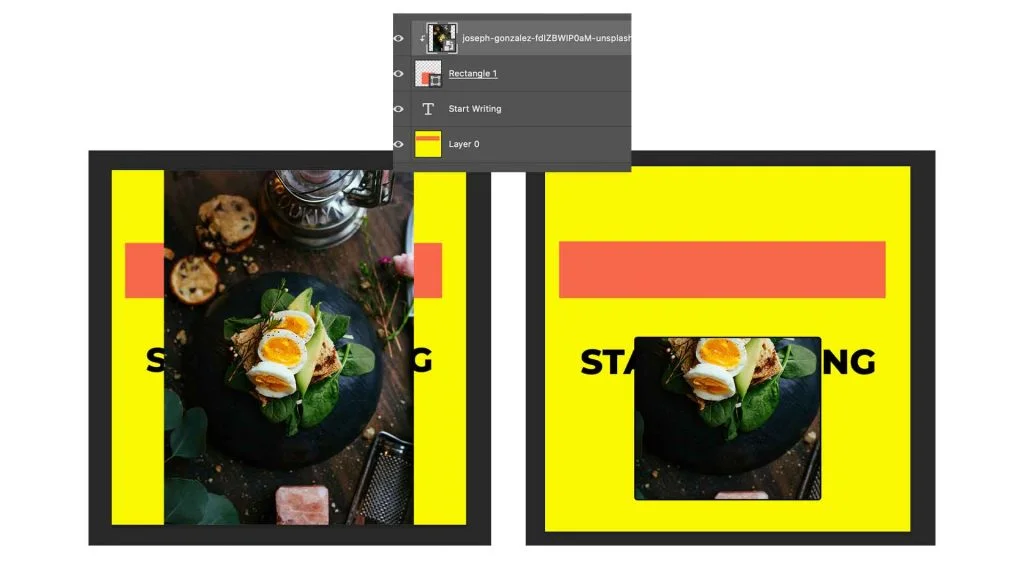
Reference: Clipping Masks in Photoshop
Now, you can achieve the same result with the layers masks too. But when using layer masks you need to start always with the selection. So, use the rectangular marquee tool and make a selection on the desired area. Then click on the add layer mask icon on the bottom right corner(refer to the image below). And the result will be:
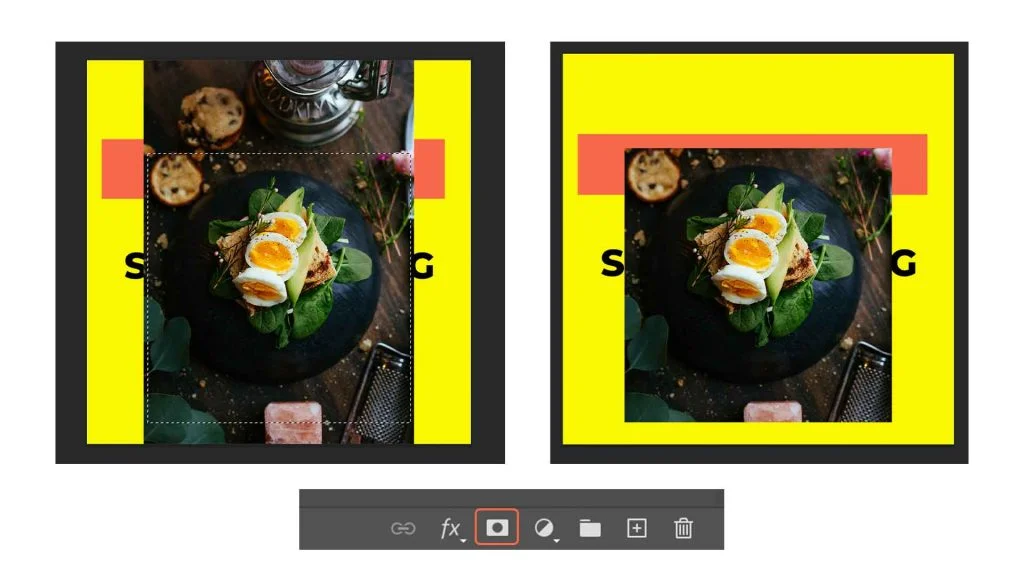
Although you can achieve the same results with both of these concepts, where and when you’ll use them is different. One works if you have a shape (Clipping Mask) while the other works if you make a selection (Layer Mask).
Reference: Learn how to mask layers to hide and reveal parts of your composite
That’s it. These are the bare minimum tools and concepts that you need to know before moving to the next step, which is all about creating awesome graphics in Photoshop.
There is no such thing as a good design or bad design. “Good Design is subjective”. So our goal should be to create something eye-catching so that it can stop the users from scrolling their feed.
But to get that final output, you need to start somewhere. Where and How? You can refer to the 6 step design process that I’ve talked about here. But let me make the process easy.
Example: Promote a sandwich – Cafe
So, I have a Cafe (I actually don’t have one. I just love designing for Fitness & Food businesses) and I would like to introduce “Sandwich” to my customers on social media. I just want to convey a message that it just cost 5 bucks *min.
Before starting to work on the design, it’s always better to see what others are doing. Use Pinterest, Etsy, Google image tag, whatever you can so that at least you’ll have some ideas to start with. Search for food banners on the internet.
Now, in this case, what I will do is, I’ll choose an image as the background, and then I’ll write text over the image in the best possible way to convey the message. Let’s start!
First of all, create a document in photoshop based on the social platform you are designing for. In my case it’s Instagram, so a square one. Never copy-paste images on Photoshop. The right way to bring an image is to go to file and hit place embed.
The advantage of importing in this way is the image layer will be converted into a smart object. And the advantage with that is you can perform non-destructive transformations (you can scale, rotate, distort, etc. without losing original image data or quality).
Reference: Understand Smart Objects
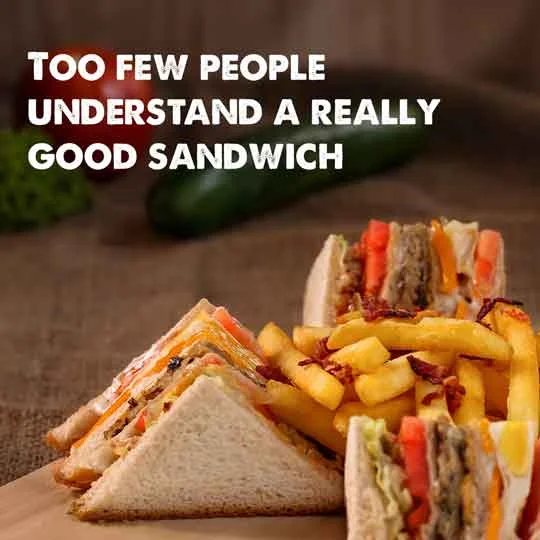
In my case, I’ve imported a stock image (Important: Real images work well on social media. And too much stock photography will ruin your brand).
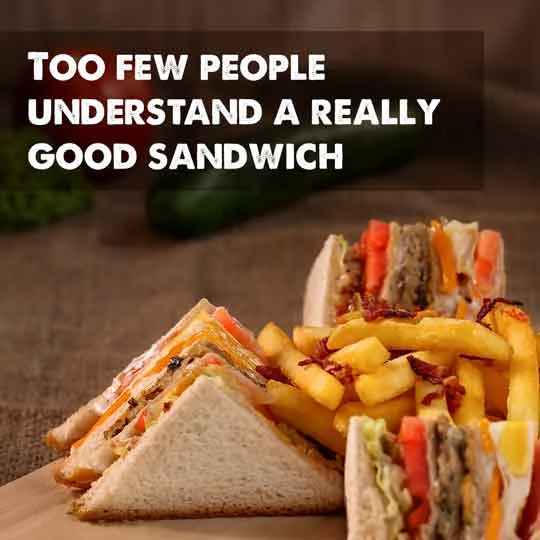
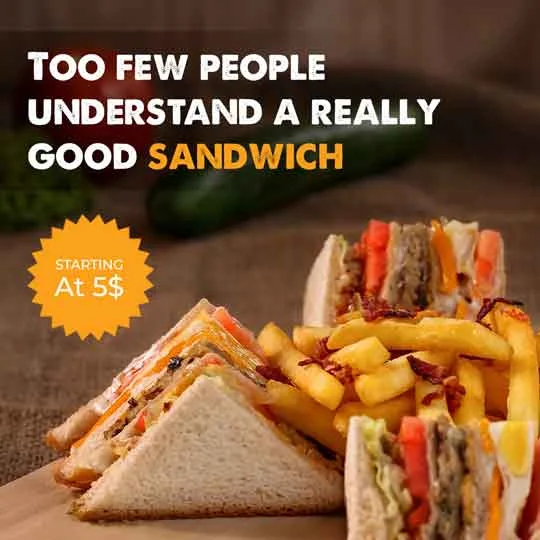
Simply write the text using the type tool. In this case, I want to write “Too few people understand a really good sandwich”. There is no perfect method to choose a font. Just choose something that is eye-pleasing. That’s it. You don’t need to read more articles or watch videos about that.
I’d like to go with a bold font, so I chose “A Love Of Thunder”.
Now, our focus isn’t completely going towards the text. So, you can add a rectangle (a bit dark color) behind the text like this.
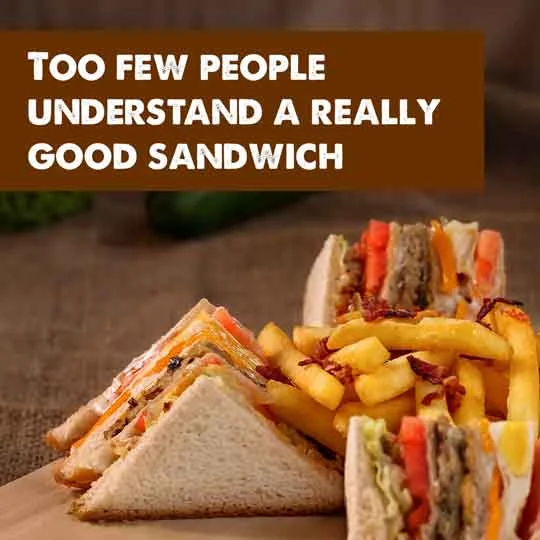
Hmm. Not looking good. So here is what I did – Changed the blend mode from normal to multiply, and reduced the opacity to 50%.
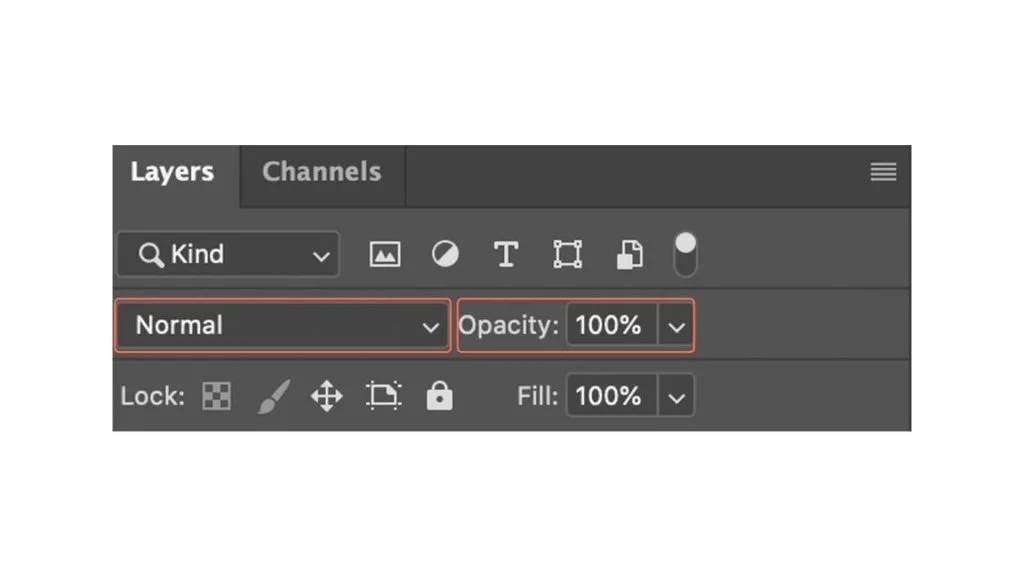
And here is the result:
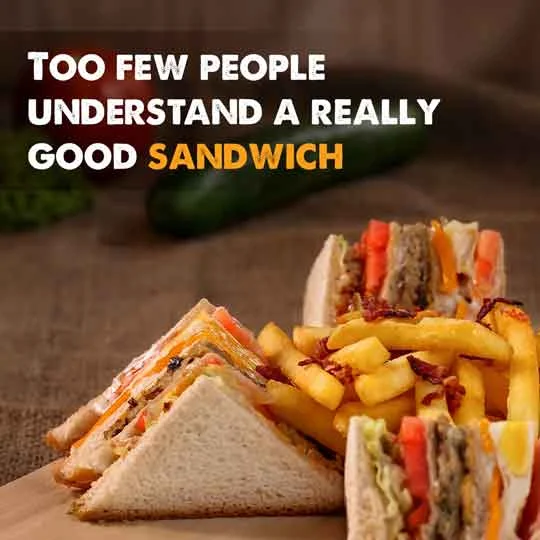
Better! But can be a bit more better. That’s when the concept of layer masks comes into play.
And this should be the final result! Oh yes, I’ve changed the color of “Sandwich” too.
I want to add one more message to the image which is, the price of sandwiches is starting from 5$ (minimum price). You can draw the shape of a price tag icon, but let’ see how you can use visual assets from google and use them in photoshop.
For this design, I’ve found an icon from google (Click here). Import that into photoshop like we have imported the image previously. I’ve then added text over the icon.
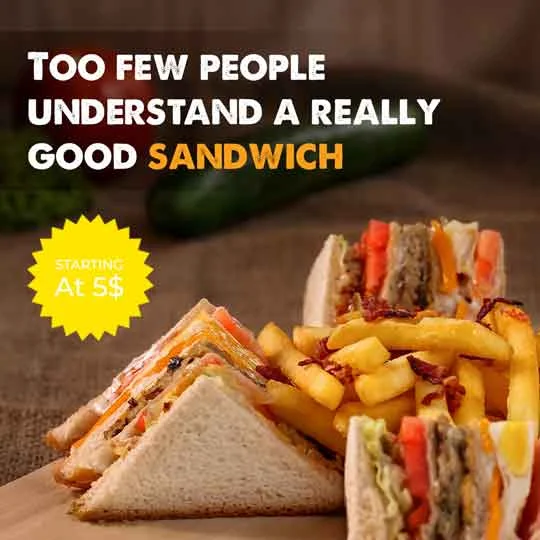
Now to change the color of the icon, add a solid color from the menu at the bottom and place it above the icon layer. Choose a color.
Now adding this solid color layer will affect the whole canvas. To add color only to the icon layer, add a clipping mask to the color layer. (Click on Alt or Option and place cursor between the two layers and when you see a symbol, just click). So this how your layers stack should look like.
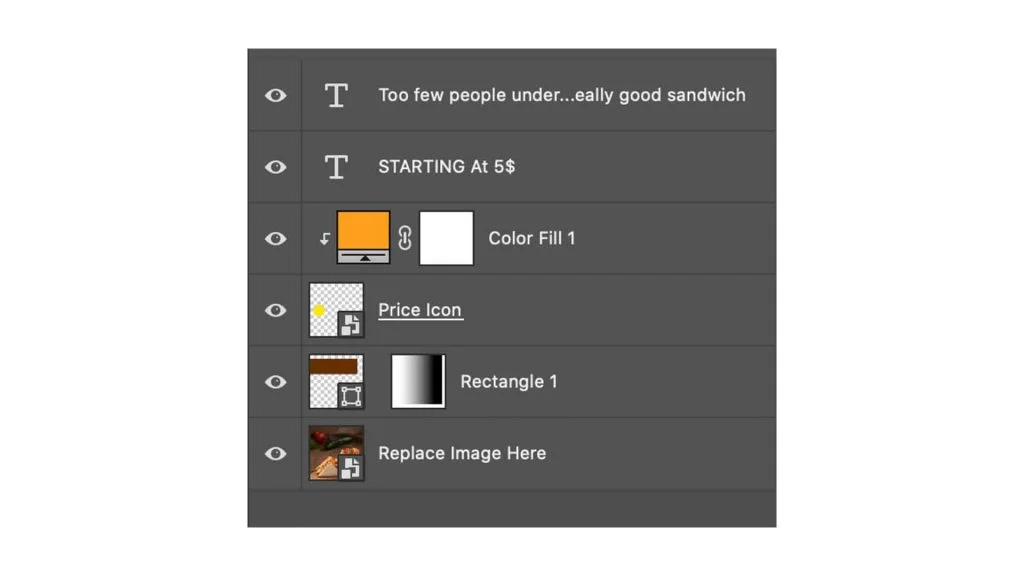
And the final result will be this:
Click on File (in the top menu), click on export and then click “Save For Web”. A settings panel will popup like this:
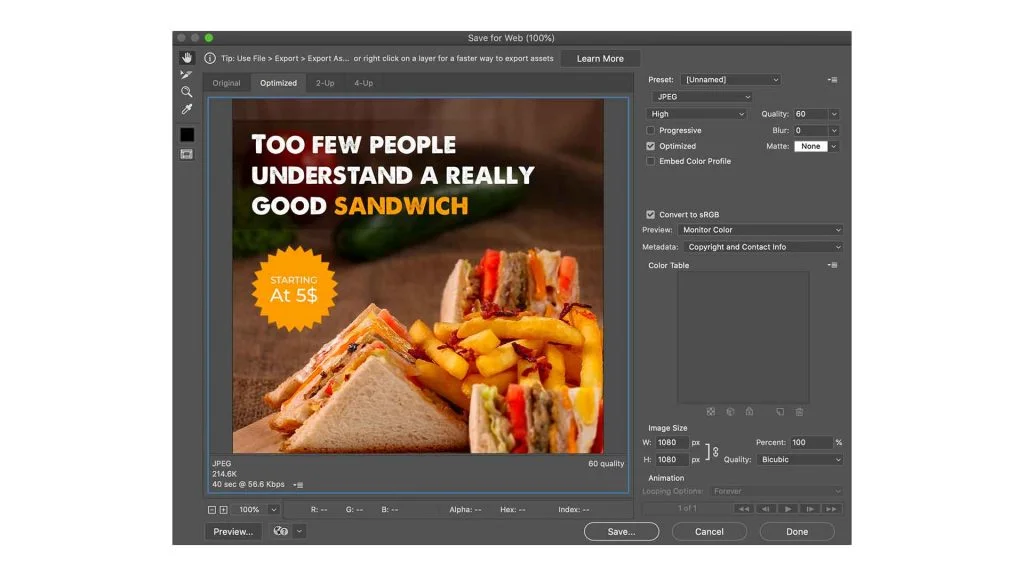
Choose JPEG – High, Percent – 100%, and leave the remaining as it is. Click on Save and choose a folder to save the image. You can even export it as a PNG instead of JPEG. Both work fine for social media.
That’s it!
I know that it’s no easy designing in photoshop. But it’s not hard too. Don’t try to learn all the features and tools that photoshop has.
Start with what I’ve mentioned in this article and you’ll be good to go. I hope this article gave you a basic idea of how to design social media posts in photoshop. Thanks for reading!
11 Comments
How To Resize Social Media Graphics & Images In Adobe PhotoshopMay 16, 2021
[…] example, let’s say you have created a social media graphic like this in Photoshop, to post on Instagram […]
5 Powerful Typography Tips To Craft Beautiful Social Media GraphicsMay 16, 2021
[…] whole point of creating an awesome social media design is to get through the clutter and convey the message to your audience in the easiest possible […]
How I Learnt Designing Social Media Posts In Photoshop & How You CanMay 16, 2021
[…] about the basics of Photoshop, I’ve written a beginner’s guide on that topic. So, that guide will help you on what tools you should learn first to get starting in […]
A Beginners Guide To Adobe Photoshop For Social Media DesigningMay 16, 2021
[…] learn the design process that I follow while designing social media posts. And after that read this article (skip the basics part as you already learned that here) where I talked about how to create graphics […]
Leon RahmanMay 16, 2021
Very helpful Information and Keep Sharing More
Sujith GodavarthiMay 16, 2021
Thanks for dropping a comment. Glad that you liked the article.
How do you create a post in Photoshop?May 16, 2021
[…] Reference 2 […]
How do I make a round frame on Facebook?May 16, 2021
[…] Reference 2 […]
How do I post to Facebook using Canva?May 16, 2021
[…] Reference 2 […]
Can you make graphics in Photoshop?May 16, 2021
[…] Reference 2 […]
How To Create Your Own Social Media Templates In Photoshop – Social Media DesignedMay 16, 2021
[…] talked about the design framework that I follow. And I’ve also written an article on how to design social media posts in Photoshop. Make sure you check the links provided to get better at […]