
Welcome to the world of PFP NFTs, where digital art meets blockchain technology to create unique and collectible profile pictures.
So you want to create PFP NFTs like Bored Apes & Crypto Punks, and were wondering how to do it without code? Well, you’ve come to the right place.
In this guide, I’ll walk you through the exciting journey of creating your own PFP NFT collection without writing a single line of code.
Picture this: your artwork, immortalized on the blockchain, is ready to be owned and cherished by collectors from around the world.
I will be creating a 10k NFT collection from scratch (and in the end, don’t forget to collect it. It’s FREE) to explain the whole process from designing and generating images to minting those JPEGs.
So, let’s get going…
PFP NFTs, short for “Profile Picture Non-Fungible Tokens,” are a unique form of digital artwork or collectibles that people use as their profile pictures on social media or in virtual worlds.
Unlike regular images, PFP NFTs are stored on a blockchain, which ensures their scarcity and provenance.
Owners of these NFTs can buy, sell, and trade them, often as a way to showcase their individuality or support a particular online community or project.
In simple terms, they’re like digital badges of honour or personalized art pieces for your online identity.
To create PFP NFTs from scratch, without writing a single line of code, we are gonna follow this 4 step process.
First of all, what’s a trait in the context of NFTs?
NFT traits are like the unique ingredients that make up a special recipe for your digital collectibles, especially those cute profile picture NFTs. Think of traits as the spices that make your favourite dish delicious!
These traits can be anything from cool outfits, expressions on their faces, or even funny accessories. Imagine putting together different combinations of these traits to create thousands of one-of-a-kind characters. This is what popular NFT collections like Bored Ape Yacht Club and CryptoPunks do to make their NFTs super interesting.
The more awesome and rare a trait is, the more people want that NFT, which makes it more valuable. So, collectors are always on the hunt for those special traits that make their NFTs stand out.
For example, Bored Ape Yacht Club has traits like background, clothes, earrings, eyes, fur, hat, and mouth.

And no two Apes have the same traits, which makes them unique.
Now, how do you plan these traits?
Think of all the important parts your characters need to have. In my case, I’ll go with:
Now, think of all the variations you can create with each of these parts.
With these traits, a total of 2160 unique characters can be created (1*6*5*4*3*6). If you want 10k, add another feature with 5 different traits – like maybe 5 varieties of legs.
Ok, now that I’ve figured out what my characters should consist of, I need to create these and bring them to life.
I’ll create Photoshop layers, and group each of these traits based on the body part. Something like this:

Pls, don’t judge the art. It’s still an art! Ok, ok…At least, it’s creative.
Now, depending on the method we are gonna use to generate NFTs, we might have to export each of these layers as PNGs. In my case, I am just keep the file as it is, which is just a PSD file with multiple layers in it.
There are basically 2 different ways to generate NFT images, without you having to code anything.
First of all, using generator tools can make the whole process easy. But not that all the tools give you an option for a mint page (where users can come and mint an NFT).
And all these tools are not free. You have to pay a certain amount to have full access to these tools, using which you can launch your NFT collection.
Here are some tools:
For example, I’ve uploaded the PSD file on Genfty and it has give me these, in a single click:

If you want to follow along, using these tools, here are some YT videos:
BTW, I’ve mentioned the best no-code NFT minting tools here, which you can also use to generate the NFTs, based on traits.
Now, this is kind of a lengthy process if you are doing using the Github code of Hashlips (Here is the tutorial if you want to do it with the code).
In our case, let’s use the software that was built based on the same code. I believe this is the best process when it comes to generating all these NFTs for free. Let’s begin!
Download the setup file from here (dmg for OS / exe for Windows) and install it. Refer to the image below:

Now, we need to have all the layers exported as images (PNGs). So, I’ve exported all the trait layers I’ve created in Photoshop, as PNGs.
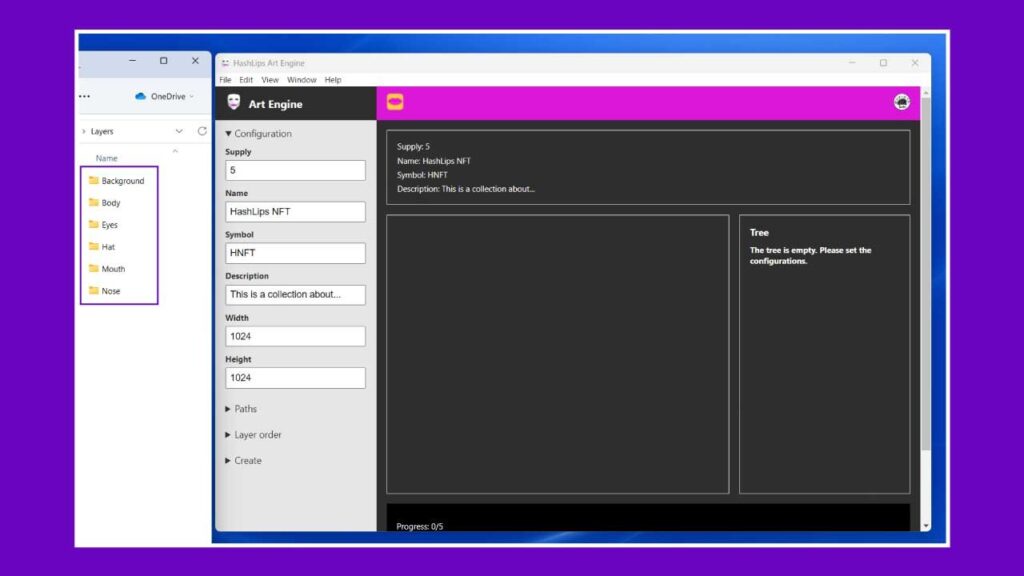
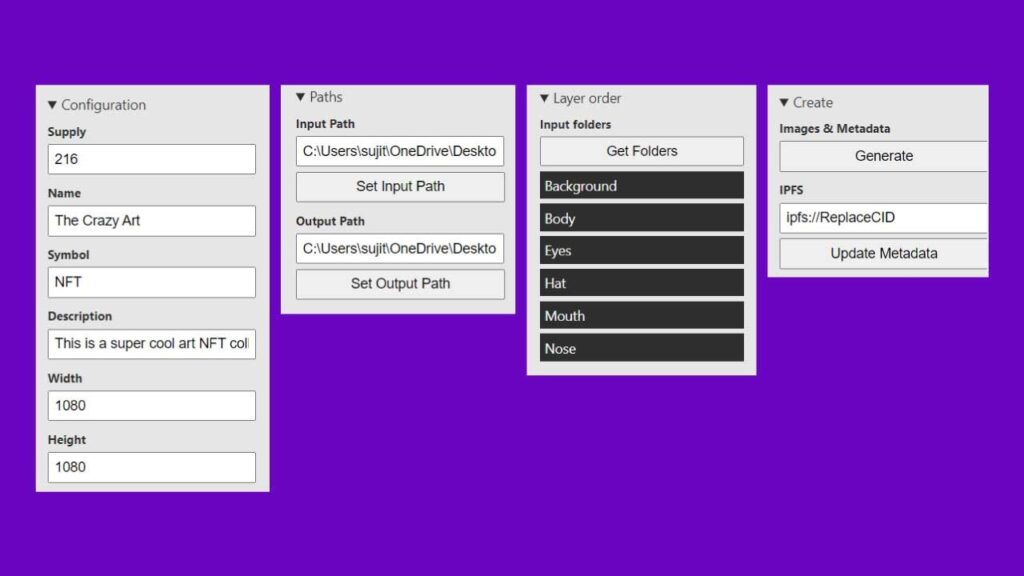
Now, fill up all the sections in the Art Engine. All of these options are self-explanatory, but here is an image for you showing all the details:
Because I set the output path to Desktop, once I hit Generate, a new folder titled ‘Build’ will be created on the Desktop which will have Images & JSON (metadata) files. Like this:
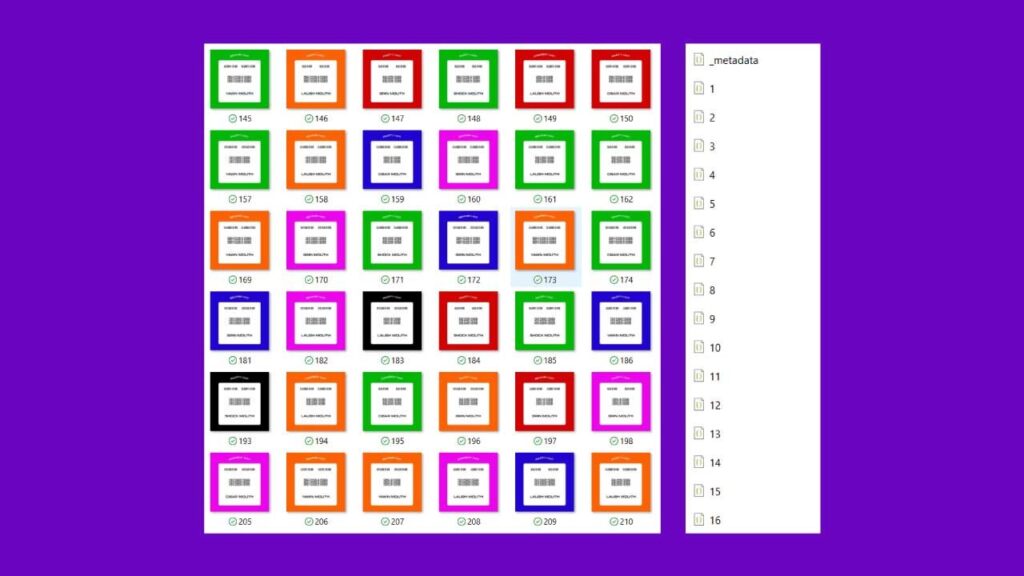
Ta Da!! We’ve got the NFT art.
Note: Don’t close the HashLips Art engine yet. We need to update the metadata, but before that, we need to upload these images online.
Now that we have the images, all you need to do is use thirdweb (a no-code NFT minting tool), to upload the images and make them ready for mint.
I’ve a full tutorial on how to do that, you can check it out here.
This tool gives you a code snippet at the end, which you can copy and paste into the web page. And make the web page ready for mint, and available to everyone.

And the minting engine will look something similar to this one (this is just for testing purposes):

And we’re done!
By using the easy steps explained here, anyone can start making these pictures and set them for minting, without needing to know how to code.
All the best for your PFP NFT Collection if you are creating one.
It depends on the blockchain you are using and whether you are minting all these NFTs by yourself or giving someone a chance to mint (assuming that you want to sell these NFTs).
The cost-efficient way is to deploy the smart contract on Polygon. And use the HashLips engine or the GitHub code to create NFT variations so that you don’t have to pay for any of those tools I mentioned above.
Here are a few things to remember:
1. Don’t use ‘-‘ in the layer names. Instead of black-mouth, rename it to just ‘black mouth’.
2. Are all the traits of equal resolution? If you want to generate NFTs in 1080*1080 size, make sure all the trait layers are of the same size. In Photoshop, instead of exporting the layers, save all the layers as PNGs by using the ‘save as web’ function. In that way, all the images will be of the same size.