
You might be using photoshop to create social media graphics for your own personal brand or for your clients. It’s a fact that Photoshop is a very powerful tool. Of course, that’s the reason why you are using it in the first place.
But are you using it in the most efficient way? If not, it might cost you a lot of time.
So this article is all about the common mistakes people make when designing social media posts in photoshop. Read it so that you’ll know if you are making any mistakes while creating content.
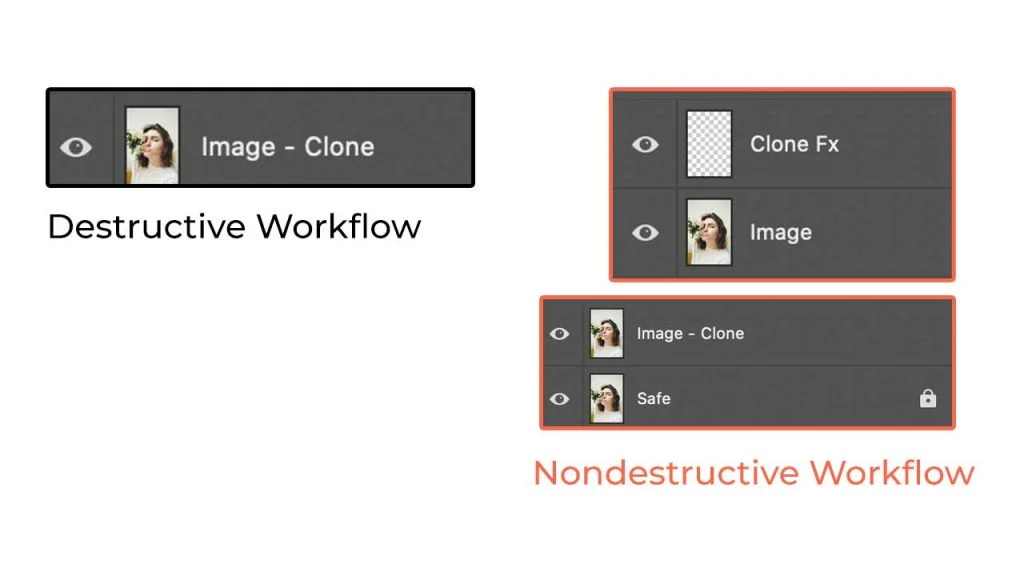
Yes, destroying things is bad. Ok, let me define what is a non-destructive workflow.
It is the kind of workflow that can help you undo any kind of things that you create on Photoshop, whenever you want.
Let’s say you have used the “Clone” tool directly on the image layer to duplicate something in a scene, and then saved the file. Now, when you reopen the file, you don’t have access to the original image in that PSD file.
Instead, if you have used the same tool, but on a new layer, you’ll have access to the original image file so that you can make changes to it if you want. Or you can duplicate the image layer and keep an image layer safe (lock it so that you won’t touch it even by mistake). And that’s called working non-destructively.
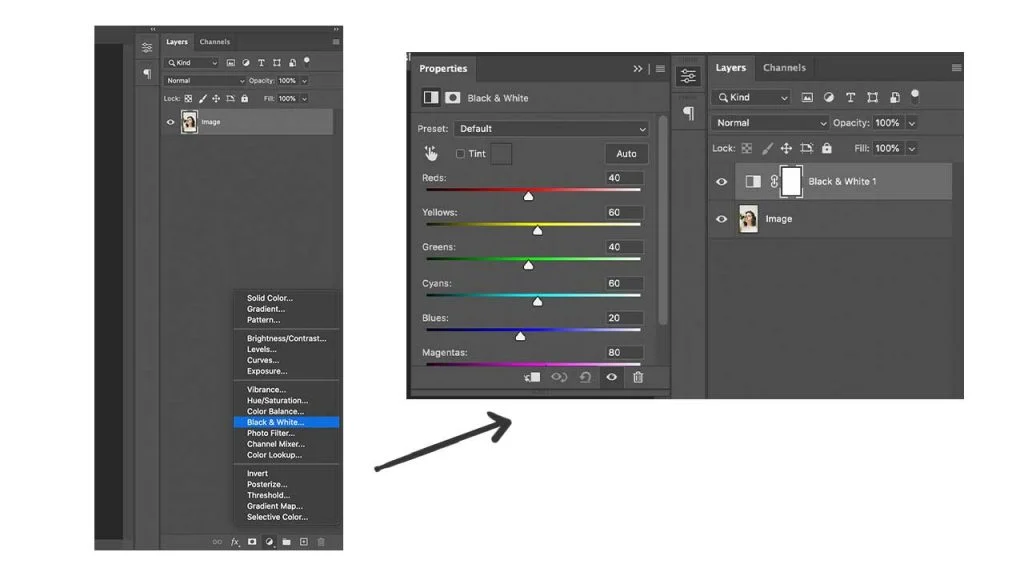
To turn a color photo into a black and white one, if you are doing this: “Go to Image (top menu), click on Black & White”, then you are making a big mistake.
Why?
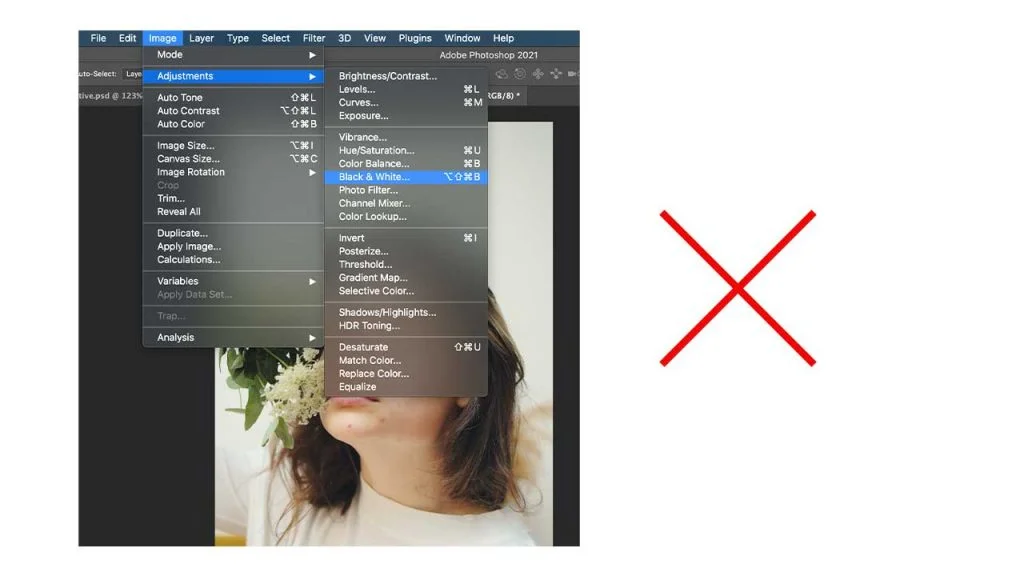
Applying adjustments directly to a layer contradicts what we have talked about in the first point. Yes, it’s destructive editing. You can’t get back the original file once you add the hue by adding from the top menu.
That’s why you should use adjustment layers. They are located at the bottom panel in Photoshop.
Shortcuts can save a lot of time than any other things that you do efficiently on Photoshop to save time. I am a big fan of learning and using as many shortcuts as I can. But here are some shortcuts that will be helpful for you while designing social media posts.
Note: Replace Opt, CMD, Delete with Alt, Ctrl, Backspace respectively if you are using windows.
Now, these shortcuts are not random. These are the shortcuts I use daily when creating social media graphics in photoshop. Learn a few a day and you’ll get the hang of out it as you apply them consistently in your design process.
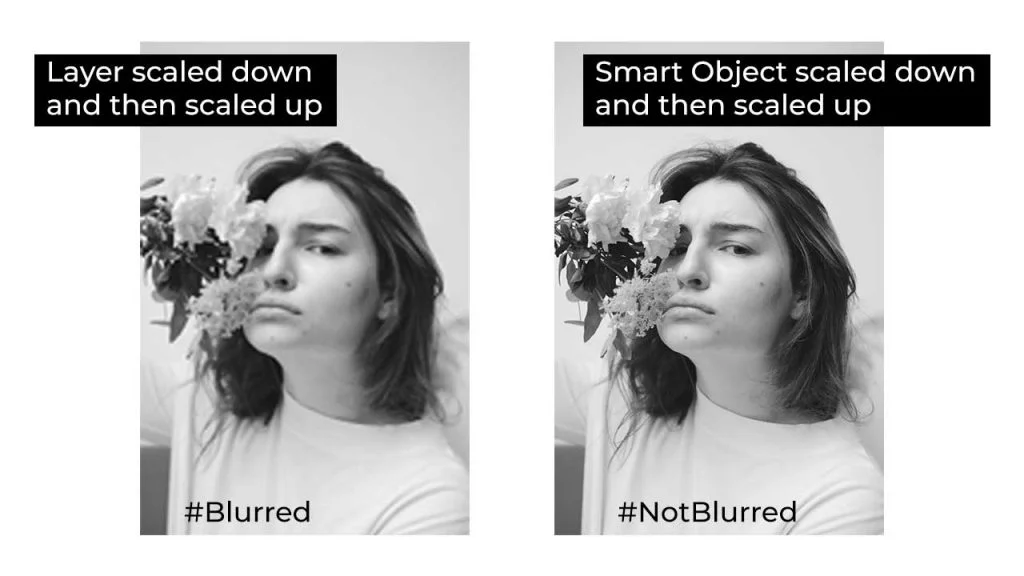
Smart Objects support non-destructive workflow and make things easier. Always import images as smart objects. Go to File (in the top menu) and click on “Place Embedded” or you convert the image that you have imported in photoshop by right-clicking on the layer and clicking on “Convert To Smart Object”.
The reason why we do this when we scale images or graphics in your social media designs, the pixels might get messed up. Whereas if you scale up and down smart objects, that won’t happen.
Another big advantage of using smart objects is if you are using a lot of the same icons, shapes, etc basically repeated stuff in a design, then you can replace all of them with the new ones easily. Let me show you how:
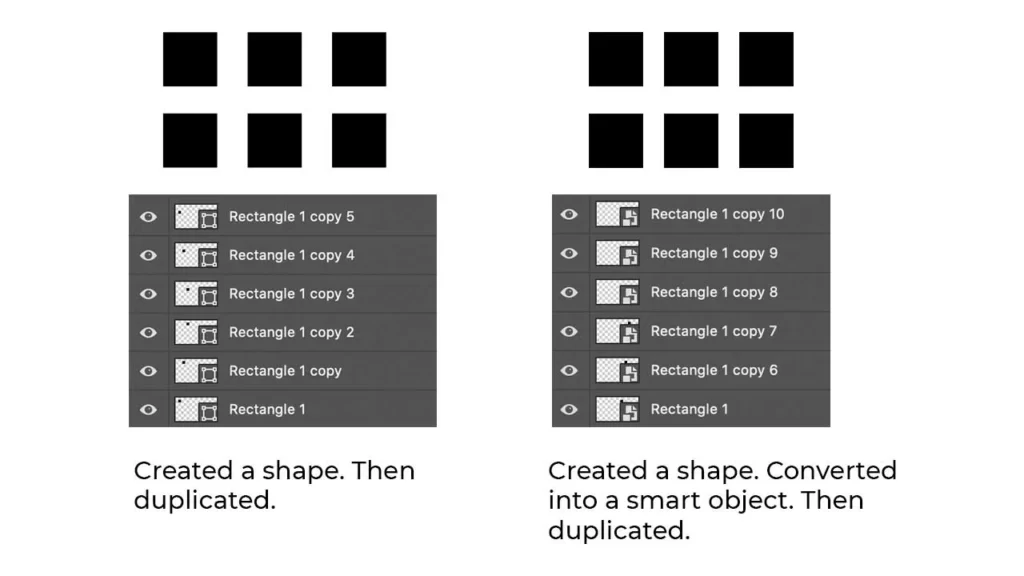
If I’ve just duplicated the squares (shapes), then I need to work on each of the shapes to make some changes. But in the case of smart objects, all I have to do is click double click on any layer. It’ll open up the new document in photoshop where I can make changes.
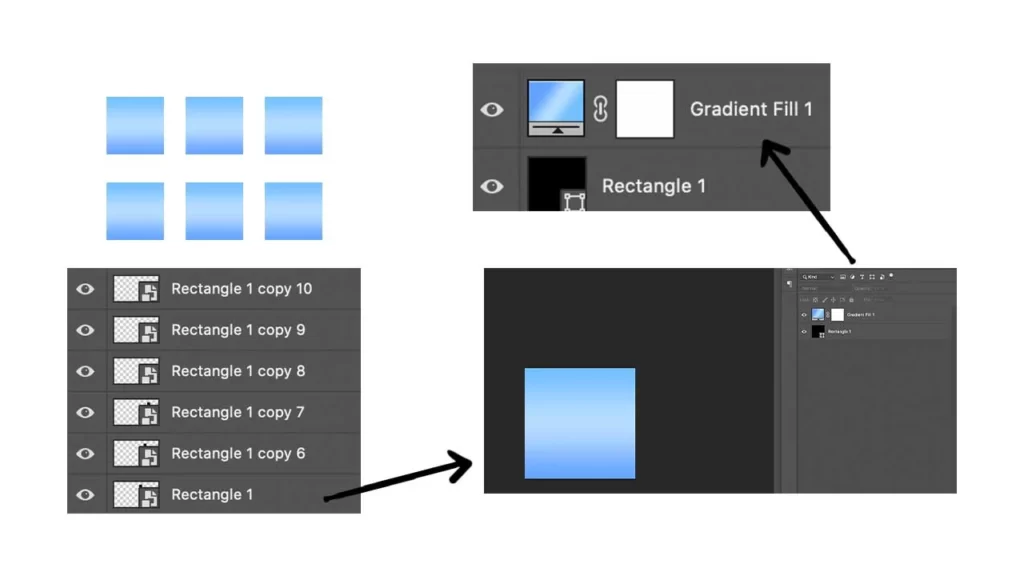
I’ve added a gradient. And saved the file. That’s it. All the other shapes got updated. Smart, right? So just use them.
It’s better to create as many layers as you can while designing content so that you’ll have more flexibility to tweak whatever you want. But the problem with that is you have to name the layers. I get it. I am lazy too. And this is something I used to not do.
If you reopen the old files, especially after weeks & months, it’ll take a lot of time to understand what layer in the layers panel represents the visual content that you see on the canvas, if you don’t name them perfectly. And that sucks.
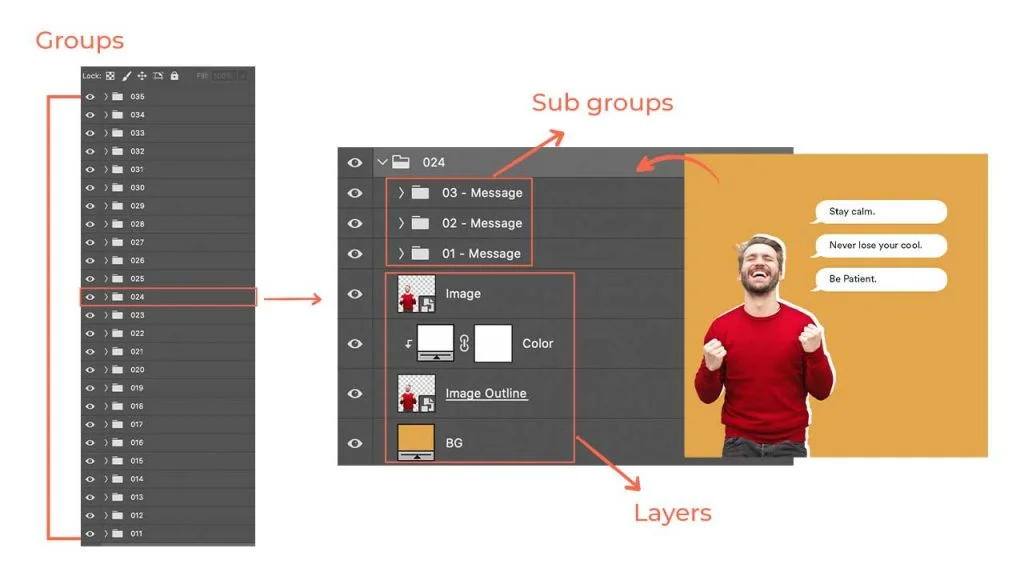
Group all the layers that represent the similar item in the canvas. Like all the text that you put at a place in a single group and all the visuals in a single group etc.
The naming is gonna be too helpful if you are someone who creates multiple social media posts in a single file like I do.
Remember: Layer 1, Layer copy 0, etc. will irritate you a lot of in the future.
Yes, photoshop is great. But that doesn’t mean you have to use it for all your design and content creation needs. For example, if you want to remove the background from an image so as to use that in your design you can use a tool like remove.bg.
If it didn’t work, you have to use photoshop anyway and cut out the object from the background perfectly. But if the online did work, it’ll save you a lot of time right? Try embedding other tools and resources in your content creation process.
You can even use the free version of Canva for some basic posts & story designs if you want to. You can try Remix by Buffer to share your tweets on Instagram & Facebook easily instead of designing them. Check out all the other time-saving free tools that I like here.
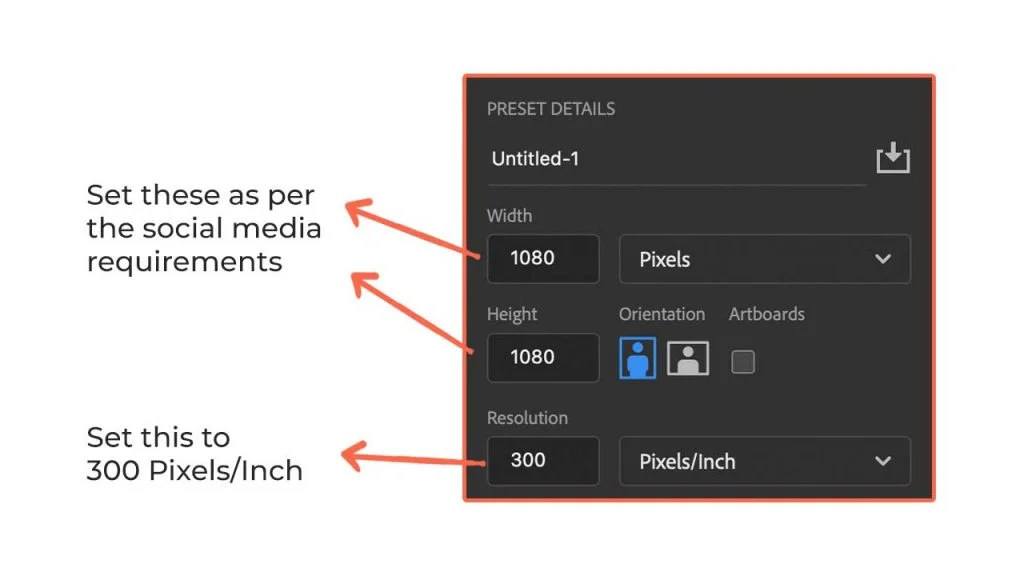
It is one of the biggest mistakes most people make. Whenever you are designing a post for any kind of social media platform, make sure you set the dpi to 300 when creating a new document. Set the width and height as per the social platform requirements.
If you don’t have the habit of hitting Ctrl + S every now and then, you are gonna face a big problem. You create a whole new awesome design and then you suddenly see this “Adobe Photoshop has stopped working”.
Just imagine the pain you have to go through if you haven’t saved it. So, save the file and save yourself.
The default workspace that photoshop gives isn’t for all. It’s just for beginners. Place all the panels that you use very often in such a way that they are accessible to you easily.
Close all the tabs that you don’t use and bring in all the tabs that you use and then save the workspace. You’ll save some time.
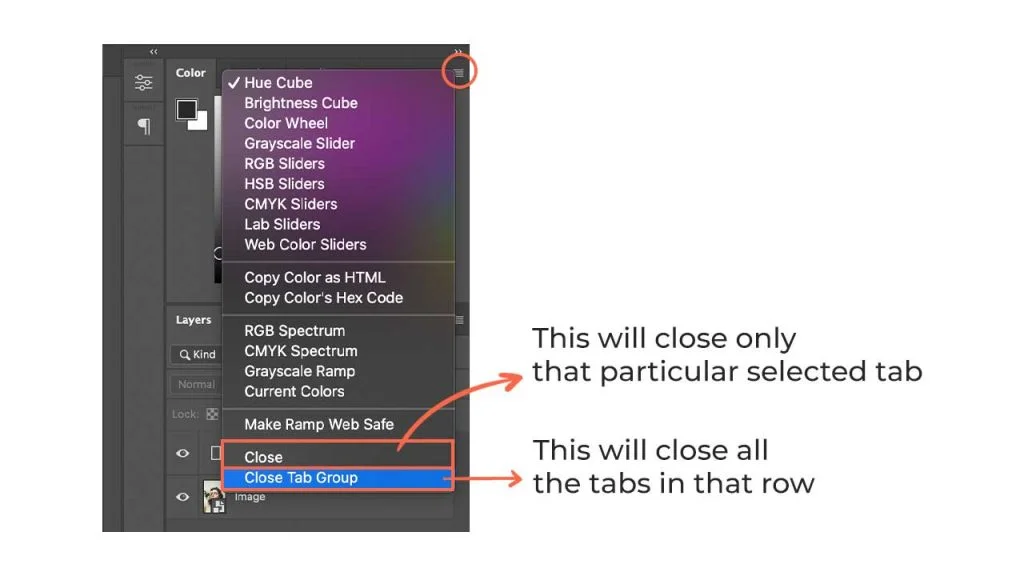
Go to Window (top menu) and click on the panels that you need or use very frequently and arrange them as you like.
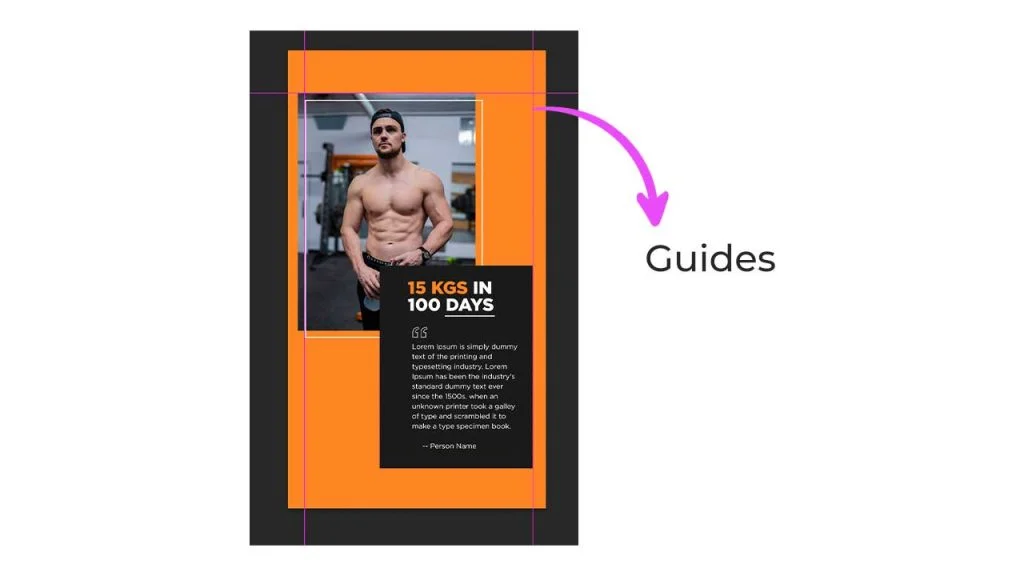
Before finalizing the design, make sure you check the alignment perfectly. The design would look pretty odd if the things aren’t aligned well no matter how attractive elements you have placed in the design. Hit CMD (Ctrl) + R to see the ruler guides and drag them as per your needs onto the canvas.
The most important thing you need to have if you are using Photoshop is patience. And the reason for that is there is a lot to learn and the learning process is almost never-ending. Take one step at a time. Just avoid making these common mistakes. Learn. Apply. Repeat.
2 Comments
A Beginners Guide To Adobe Photoshop For Social Media DesigningJuly 16, 2021
[…] save it first (CMD or CTRL + S) and name it properly. “Not saving” is one of the most common mistakes people make when designing in […]
30 Photoshop Shortcuts To Help You Create Social Media Content FastJuly 16, 2021
[…] even hard to remember all of them and you are an alien if you can remember all those. And it’s a mistake to not learn and use the shortcuts. So, what’s the […]