
If you have to deal with crypto and Dapps, wallets are the way. In the world of web3, a wallet is your identity.
You build your on-chain reputation with the transactions you make from your wallet.
So, in this article, I am gonna talk about Metamask, one of the most famous crypto wallets out there.
From wallet creation to wallet safety, adding custom networks & tokens to swapping tokens & interacting with DApps, this will be your go-to guide for Metamask.
Let’s dive in!
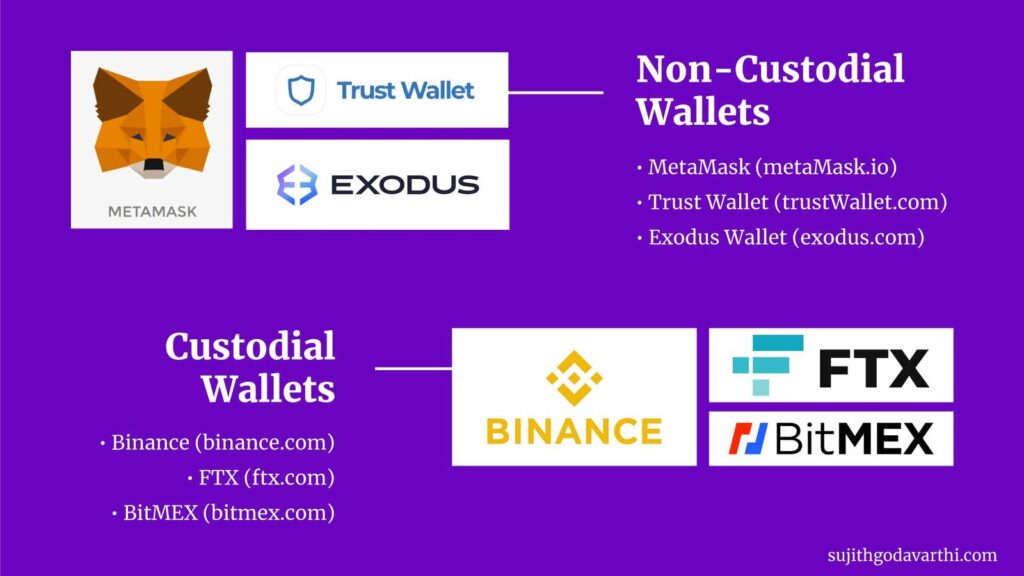
Before getting into the technical details of installing & using Metamask, let’s talk about web3 wallets in layman’s terms. By web3 wallet, what I mean here is a “Non-Custodial Wallet”.
If you own your private keys (in the case of Metamask, you do own them) it’s a non-custodial wallet. If a third party owns your keys, then it’s a custodial wallet. Yes, you’ll have a chance to recover the funds if you lose your keys in the latter case, but have you ever heard of this web3 philosophy quote?
“Not Your Keys, Not Your Coins”
Using a non-custodial wallet is part of becoming a sovereign individual. Be your own bank!
A web3 wallet is a tool to access the new internet (web3), an internet that is being built on top of blockchain technology.
What makes web3 wallets so powerful is, that the users have control of their assets inside the wallet.
Governments can freeze the funds in my bank account. Some hackers can steal money from a financial institution. But no one, not even Metamask, can steal/freeze the funds from my Metamask wallet.
For you to access anything that has to do with Blockchain Technology, you need a web3 wallet.
Click on the puzzle icon on the top, and then click on the pin icon beside the Metamask, to make sure it’s always pinned to the extension bar.

Now, to create an account, click on the Metamask icon (Orange fox icon) from the chrome extension bar. And click on ‘Get Started’.
You’ll have two options. Since we are creating a new account here, click on the second option that says ‘Create a Wallet’.

Once you do that, click on ‘I Agree’
Now, you’ll be asked to create a password.
Create a new password. (Important: This is the password that you’ll be using every time you log out from the wallet & it is not the seed phrase).

After that, click on ‘Next’
Now, comes the Seedphrase part. Write down the Secret Recovery Phrase somewhere on paper (Metamask recommends writing it down on multiple pieces of paper and storing each in 2 – 3 different locations). And click on ‘Next’ once you have noted it down.

Now, time to add all the words you noted down in the order.

Click on ‘Confirm’ once done. And click on ‘All Done’ on the next page.
That’s it you have created your Metamask wallet account.
If you click on the Metamask icon, this is what you should be seeing:

Finally, here are some tips from Metamask regarding your recovery phrase:

Ok, we have seen how to create a wallet.
Every time you want to access your wallet account via a new device, you need to import the wallet. Same, if you reset your device.
So, to import your wallet, the process is similar to what we have done in the previous section, only this time we need to go with ‘Import Wallet’ instead of ‘Create a wallet’.

You can add the recovery phrase, and create a new password.
Hey, what to do when I forgot my password and wasn’t able to log in?
It’s ok to forget your password, but never ever lose your seed phrase. Not your keys, not your coins.
You can always reset the password and use your recovery phrase to create a new password. See the image below:

Now, let’s explore some more options that this crypto wallet has:

If you click on the 3 dots that you see in the top right corner of the wallet, you’ll see 4 options.
You can:
You can create multiple accounts in Metamask, and each will have the same recovery phrase and password.
To create a new account, click on the profile icon and click ‘Create Account.

Each account will have different addresses. And you can even transfer funds between the accounts using the send option if you want to.
Once you create an account on Metamask, you’ll see two things: Ethereum Mainnet (on the top), and 0 ETH (on the bottom).
IMAGE
What that means is you have 0 Ethereum on Ethereum Network (Eth Mainnet). Now, all the currencies are tokens that won’t be built on Ethereum Network.
Now, let’s say someone sent you some USDC to your wallet, but on Matic Network. Then, you can’t find those on Eth Mainnet. For that, you have to add Matic Network to your wallet. The same goes for Arbitrum, Optimism, Binance Smart Chain, etc.
So, how to add a network? If you click on the ‘Eth Mainnet’, you’ll see an option to add a network.

Now, all you have to do is fill in the details of that particular network.
In this case, since we are talking about adding the USDC in Matic/Polygon Network, let’s find the details from the Matic’s official docs, and add those.
That’s it. Matic Network was added to the wallet, and you can now switch between Ethereum & Matic networks.

Here are some links from trusted sources to add other crypto networks to your wallet:
Finally, the simple way to add networks is directly from the blockchain explorers.
For example, if you want to add the AVAX network, you can simply head to Avalanche Explorer and at the bottom, you can see ‘Add C-Chain Network’.

The details get filled up automatically. All you had to do is just click on the ‘Approve’ button.
Simple, right?
Ok, now that we have seen how to add networks, let’s see how to add tokens in those networks.
Continuing the previous example: USDC token – Matic Network, you have added the Polygon Network. But you don’t see the tokens that your friend has sent you, yet.
So, to add USDC, we need to find the token address of USDC. For that, you can use Coinmarketcap.
Once you get there, make sure you find the token address for the Polygon network, not Ethereum, since we need to find USDC in Polygon.

Now that you have the address, you can import the token into the Matic Network. See the image below on how to do that:

That’s it. You can view USDC in your Matic Network now.
Note: It shows ‘0 USDC’ because your friend lied to you and he didn’t send any tokens.
Can you buy crypto from Metamask? Of course, you can. Just use the ‘Buy’ option.
But buying crypto in exchanges and then transferring the coins to Metamask is the best option. And moreover, you can only buy a few tokens directly via Metamask.
CoinDCX and Binance are my favourite crypto exchanges.
To send crypto, you need to find two things:
If I have to send ETH from CoinDCX to Metamask, here is how I do it:

Sending tokens from Exchange to Metamask = Withdrawing tokens from Crypto Exchange + Depositing those tokens in Metamask.
That’s it. Simple or not?
Let’s say I have 0.1 ETH in my ETH Mainnet. And I want to sell that ETH and buy USDC.
So, if I have to sell, buy & transfer the tokens, here are the steps I need to follow:
Now, that’s a lot to do. That’s when Metamask’s ‘Swap’ function can help.
All you have to do is:
See the image for reference:

Now, the USDC tokens should appear on your wallet, and some amount of ETH should disappear.
Done!!!
A wallet is a basic need for anyone to get started in web3. Whether to learn web3 or participate in Defi pools or store crypto or buy NFTs from OpenSea, a wallet is a must.
And that is the reason why learning more about this powerful tool is crucial.
I hope I made using Metamask simple and easy for you.