
Etherscan is a gem for analyzing cryptocurrencies and NFT projects. Whether it’s fungible or non-fungible tokens, Etherscan has a lot of information (publicly available) that one can use to evaluate web3 stuff.
But most people don’t use it. And most, don’t know how to use it.
Worry not, I’ve come up with a full guide!!
This ultimate guide is gonna cover a lot of topics like evaluating NFT projects, reading smart contracts, researching token holders and distribution, and more.
So, let’s not waste time and get into it.
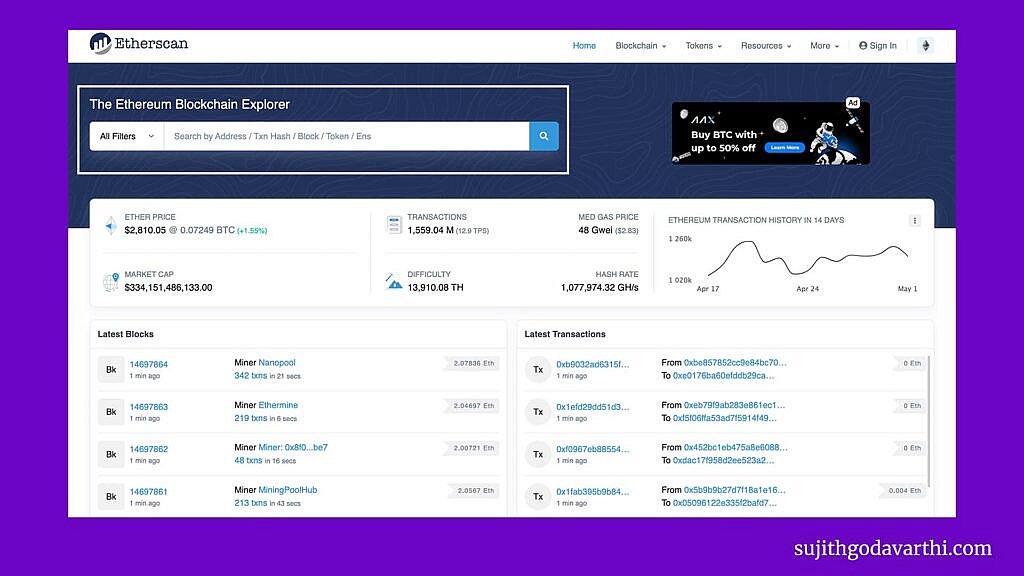
Etherscan is a free blockchain explorer and analytics platform for the Ethereum Network. It contains all the data (publicly available) that happens on the Ethereum Blockchain.
Another way to describe Etherscan is like a search engine in the web2 world. We use Google to search for content and we get results that are indexed on Google.
Similarly, we can use Etherscan to search for ‘data’ and we get the results that happened on the Ethereum blockchain.
By data, I mean wallet addresses, transactions, smart contracts, token holders, etc.
Etherscan is our navigator for the Ethereum Blockchain.
There is a lot we can do with Etherscan! But let’s start with a small example.
Let’s say you have a Metamask wallet.
If I know the address of your wallet, I can search for that address and see all the tokens (ETH, USDC, etc) and NFTs you have on your wallet along with the transaction history.
Now that I can see what NFTs you hold, I can get into the smart contract details of any particular NFT project that you hold and find more information about it: token holders, transaction history (how many people are buying it and selling it).
I can even use a transaction hash (A TxHash is a unique string of numbers that identifies a transaction on the blockchain) to search on Etherscan and see its status: Failed/Pending/Succesful.
One can even use Etherscan to revoke access to a specific wallet address from a Dapp if you see any suspicious activity.
You see, the use cases are endless. And moreover, it’s free to use for anyone. And definitely, a tool that you need to master if you are investing your time or money in the web3 & crypto space.
Spying is a good thing in the web3 space.
It helps you to know what NFT projects people are buying & selling, what tokens they are HODLing, the activity of the crypto whales, and more.
First of all, you need a wallet address. You need to know the wallet address of the person that you want to track. Or simply, you need to know the ENS name (if he/she has one).
Once you open Etherscan.io, you’ll find the search option where you can enter wallet address, transaction hash, block, token, & ENS.
In this case, let’s go with wallet address/ENS. ENS names are .eth names. My ENS name is sujith.eth. You can use the ENS name to find the wallet address.
Once you enter the ENS name (I entered vitalik.eth) and click on the search icon, you’ll see the controller of that name is a wallet address.
If you click on the wallet address, you’ll enter into the wallet and can see the waller overview and transaction history.
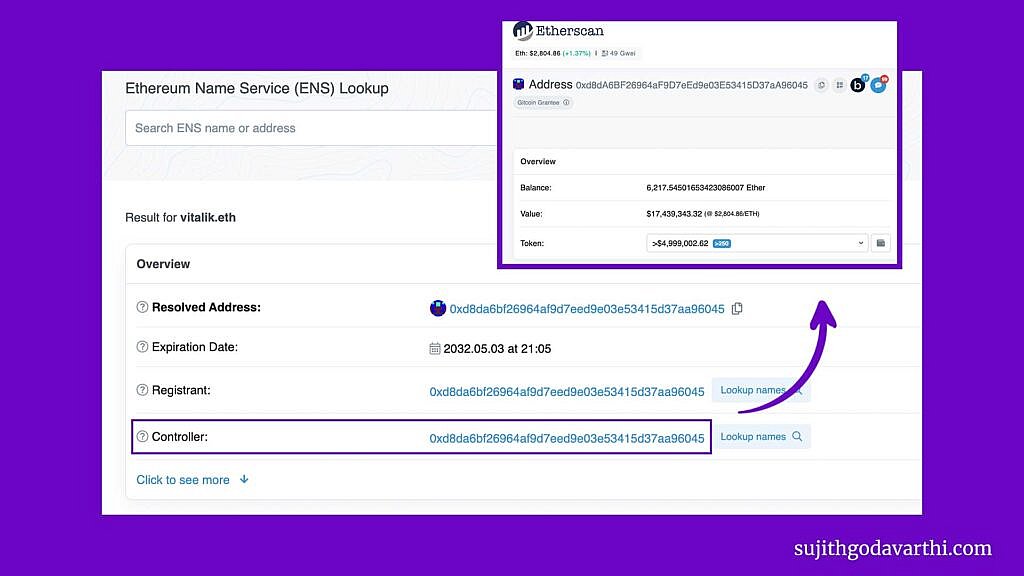
Ok, now that we have entered into the wallet let’s start spying! (By the way, this is the wallet of Vitalik Buterin: Creator of Ethereum)
You can see how much ETH Vitalk holds and its value in USD, and if you click on the dropdown menu, you can see all the fungible and non-fungible tokens based categorized via the token standards: ERC-20 and ERC-1155.
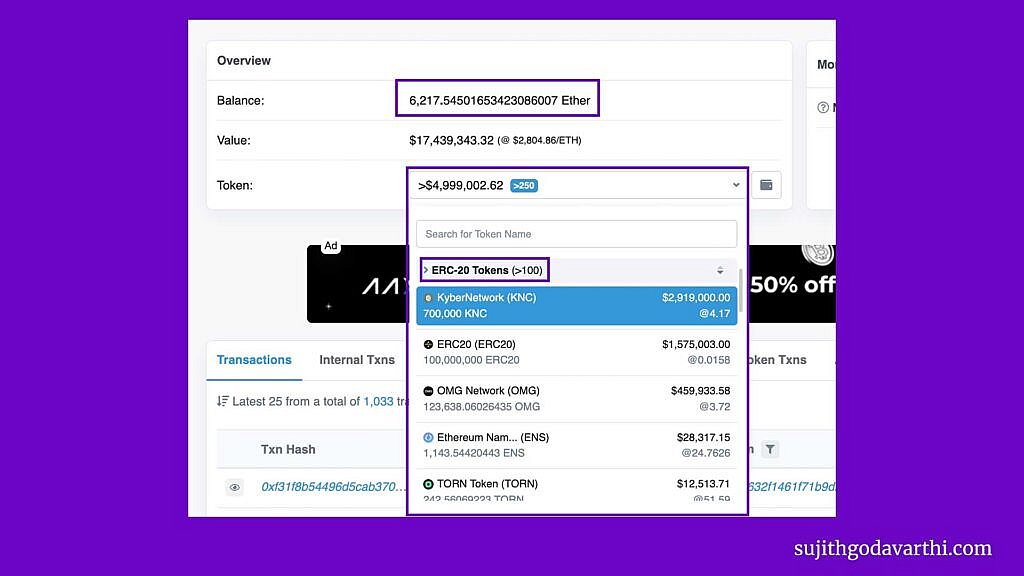
And if you scroll down the page, you can see all the transactions list.
Ok, we have covered some important points. Now let’s define what each of these columns actually means:
Now, let’s take one of my transaction details to see what’s inside a transaction hash:
This is a transaction I made to claim an airdrop ($KNIGHT tokens). 38,530 KNIGHT tokens are transferred from an address to my wallet address. And the current price of those tokens is $373.40 (Click on the dollar amounts to switch between the current price & price on the day of the transaction).
Similarly, for the gas fee, what we see is the current value of the gas fee in USD for the amount of ETH I paid.
So, 0.002690356997080587 ETH’s current value is $7.55 and the value on the day of the transaction is $8.53.
You can also see the price of ETH on the day of the transaction is $3,168.91.
So, the fee I paid –> 0.002690356997080587 ETH = 0.002690356997080587 * $3,168.91 = 8.52549919162 (That’s how the fee value is $8.53 on the day of transaction)
Now that we understand the basics of Etherscan, let’s see how we can use it to evaluate web3 projects.
Let’s take ENS as an example to find this. Now, to find the smart contract address of the ENS project, all I have to do is find the ENS collection on OpenSea.
And then click on any NFT from the collection. I click on mine (obviously!).

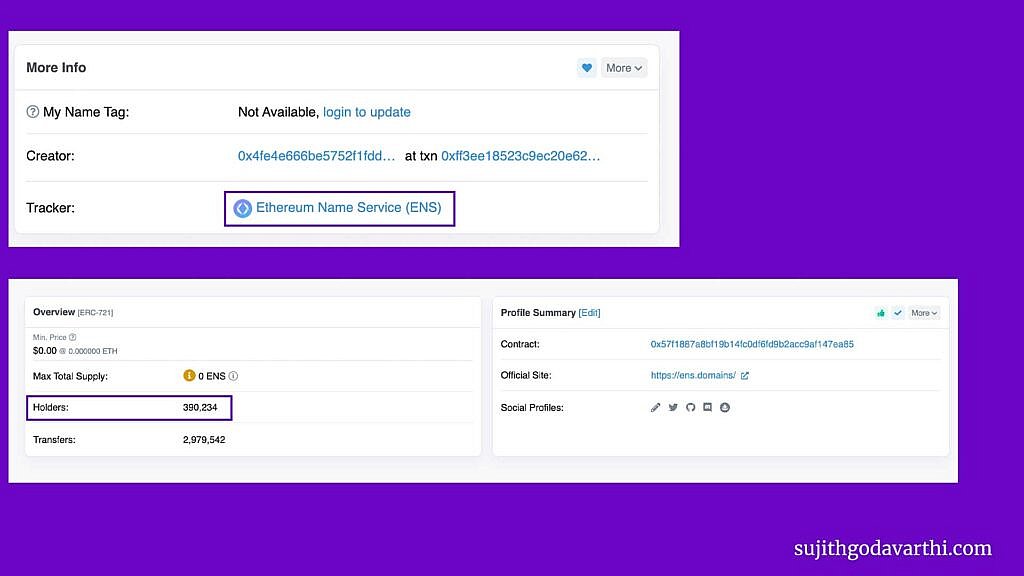
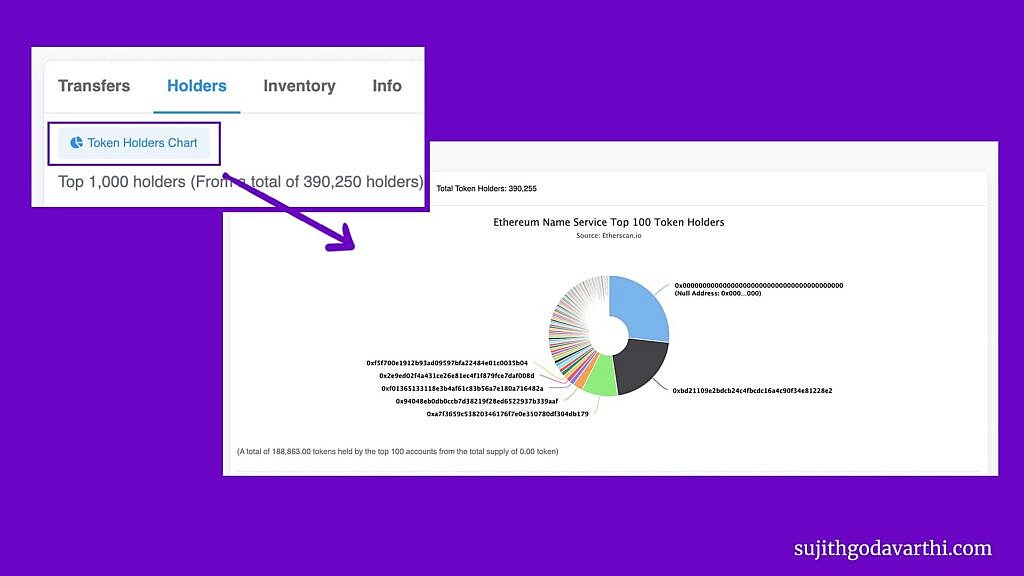
To see the holder distribution, click on the token tracker. Then you can see details like token holders (390,234), transfers (2.9M), smart contract address, official website, and social profiles.
You’ll only see the maximum total supply if a maximum has been set. For ENS, there is no maximum supply and so you see ‘0’. (Refer to the image below)
Note: Social profiles & official website section is optional – You don’t see them for all the contracts.
Now, just scroll down and head to the ‘Holders’ section to see the top ENS domain owners.
As you can see in the below image, the top holder owns 50,560 ENS domains. (You can also click on the wallet address and see what other assets/tokens it has)

To get a perspective on the distribution, you can click on the ‘Token Holders Chart’ and see the Top token holders.
Now, let’s analyze the ‘Transfers’ section.
You can see whether ENS names are being registered (minting NFTs) or being transferred (trading NFTs) based on the ‘Method’ column. And if you want to see what NFT just got minted/transferred, you can click on the ‘View NFT’.
I own an NFT called Primate Social Society. Now, let me get into the contract details, and find the metadata. Note: You also need to know the token ID.
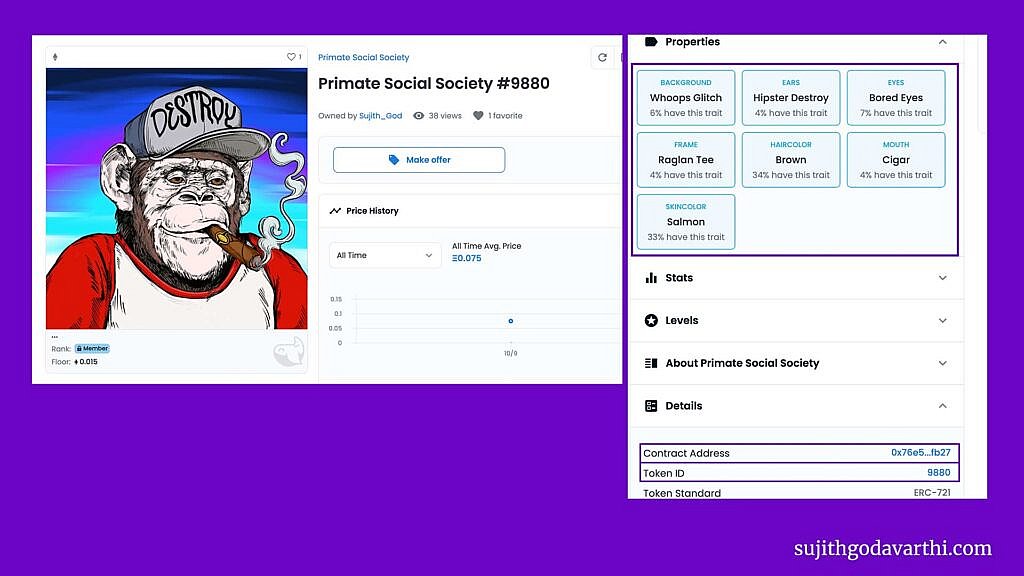
From the above image, we know the properties of the NFT, the token ID (9880), and also the smart contract of the NFT project.
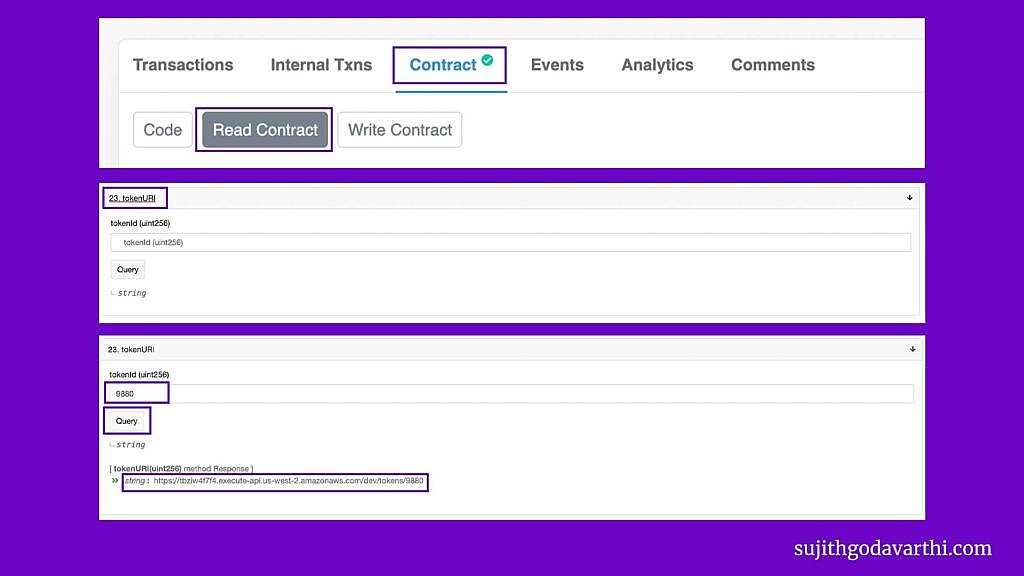
Once you click on the contract address, head to the ‘Contract’ and click on ‘Read Contract’. After than, find the ‘TokenURL’ section and enter the token ID (9880 in this case), and click on ‘Query’. It returns a string. (See Image below)
Copy the string and paste it into your browser. You’ll see a lot of details about that NFT there.
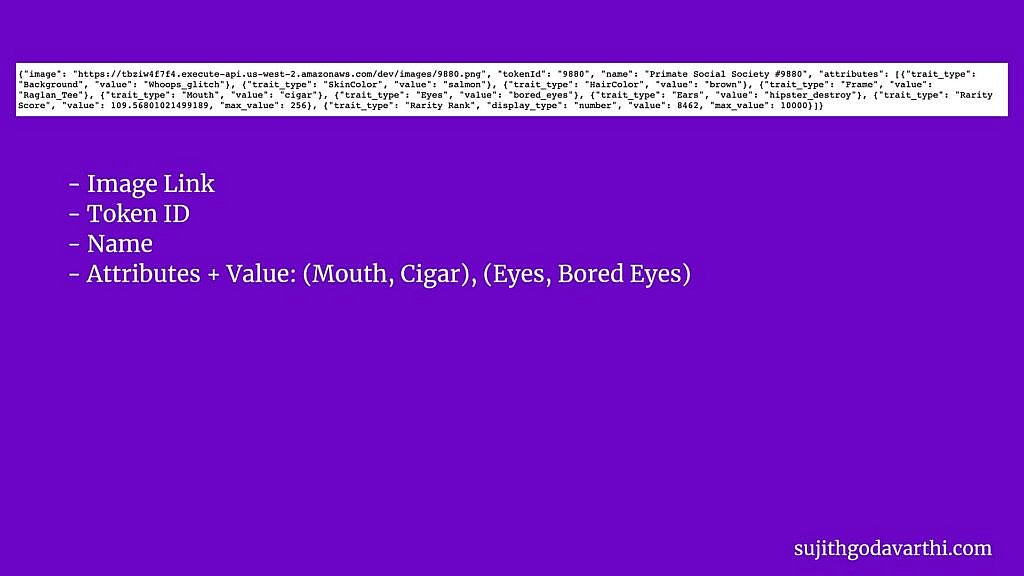
This method will be quite helpful when the metadata in the Opensea or any other NFT marketplace doesn’t get updated.
You can check all the metadata from the contract itself.
In the previous section, we used the ‘Read Contract’ option to find the metadata of an NFT.
Now, to mint an NFT we need to use the ‘Write Contract’ option. But before that, you need to know the smart contract address of the NFT project you want to mint.
Once you enter the contract address and head to the ‘Write Contract’ section, here is what you need to do:
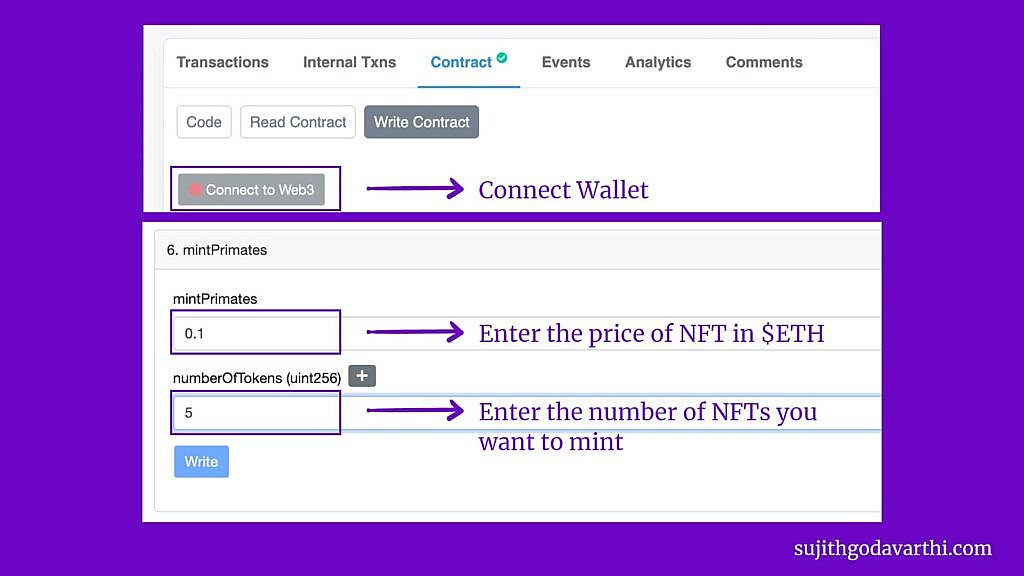
Once you enter the details and click on ‘Write’, the NFTs will be minted.
The transaction will fail:
You can head to your wallet overview section: Etherscan.io/address/’Enter your wallet address here’/ to see the status of the transaction.
This process is similar to how we checked the ownership distribution for NFTs. Only this time, we are checking for fungible tokens.
That’s it. You will see all the token ownership distribution info there.
From the wallet overview section, go on the ‘Analytics’ tab and click on the ‘TxnFees’
With Etherscan, you can track the wallets, transactions, who owns what kind of tokens, NFT ownership distribution, and more.
I hope this guide gave you the answers that you are looking for.